velero

简介

Velero 让您:

  • 备份您的集群并在丢失时恢复。
  • 将集群资源迁移到其他集群。
  • 将您的生产集群复制到开发和测试集群。

Velero 包括:

  • 在您的集群上运行的服务器
  • 本地运行的命令行客户端

Velero 不具备版本管理功能,只能进行增量恢复,不会进行删除或覆盖操作(资源存在不恢复)。

原理

Velero 首先会在集群中创建各种 CRD 以及相关的控制器,通过对 CRD 对象的操作完成备份、恢复行为。Velero 的工作原理图如下:

  1. Velero 客户端调用 Kubernetes API 服务器创建 Backup 对象。
  2. BackupController 监听 Backup 对象变化,以执行备份过程。
  3. 备份时,BackupController 通过 API Server 查询相关数据。
  4. 备份后,BackupController 将数据上传到对象存储。

运维拓扑图如下:

img

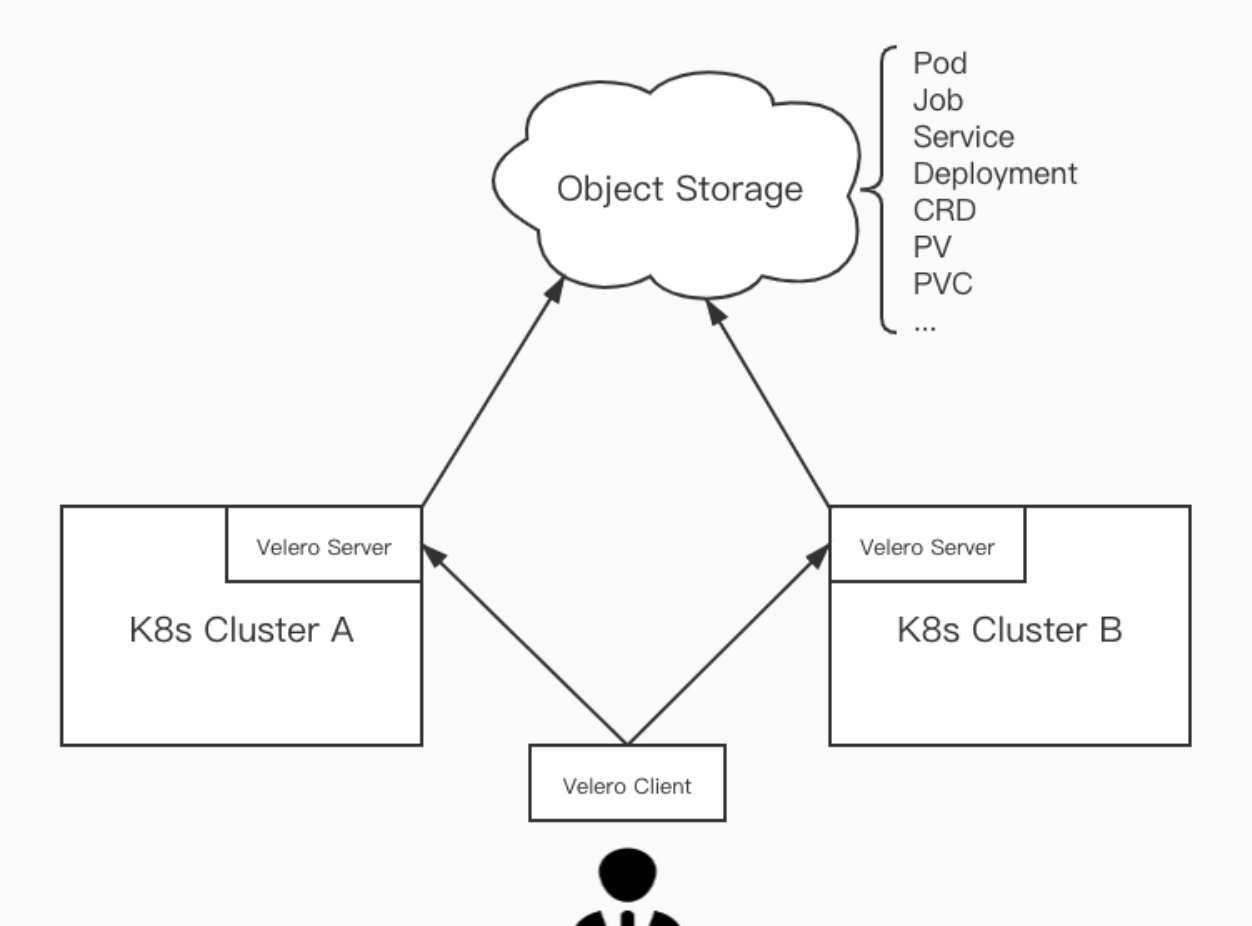
在所有集群上安装 Velero,运维人员通过 Velero Client 给 Velero Server 发送备份、恢复请求。Velero Server 推拉指定的 Kubernetes 对象的数据。这些数据以 Json 格式压缩存储在对象存储服务中。

install

镜像

1
2
3
4
  velero/velero:v1.8.1
  velero/velero-plugin-for-aws:v1.4.0
  velero/velero-restic-restore-helper:v1.8.1
  bitnami/kubectl:1.16.15

配置好credentials-velero, minio 的账号密码

1
2
3
[default]
aws_access_key_id = admin
aws_secret_access_key = xxxx

安装步骤

  • s3Url 要填minio的NodeIP:NodePort
  • 在minio上面创建对应的bucket
  • 导入velero.tar镜像到镜像仓库
  • 准备好secret-file
  • 执行安装命令
1
2
3
4
5
6
7
8
9
10
11
12
13
14
15
16
17
velero install \
   --plugins velero/velero-plugin-for-aws:v1.4.0 \
   --provider aws \
   --bucket velero \
   --namespace velero \
   --secret-file ./credentials-velero \
   --velero-pod-cpu-request 200m \
   --velero-pod-mem-request 200Mi \
   --velero-pod-cpu-limit 1000m \
   --velero-pod-mem-limit 1000Mi \
   --restic-pod-cpu-request 200m \
   --restic-pod-mem-request 200Mi \
   --restic-pod-cpu-limit 1000m \
   --restic-pod-mem-limit 1000Mi \
   --use-restic \
   --use-volume-snapshots=false \
   --backup-location-config region=minio,s3ForcePathStyle="true",s3Url=http://NodeIP:NodePort \

配置说明

查看安装情况

1
2
3
4
5
6
7
8
9
10
11
12
13
14
15
16
# kubectl get all -n velero
NAME                          READY   STATUS        RESTARTS   AGE
pod/restic-ljf5m              1/1     Running       0          23h
pod/restic-mn7dm              1/1     Running       0          23h
pod/restic-r8mt6              1/1     Terminating   0          29h
pod/restic-rxcs7              1/1     Running       0          23h
pod/velero-6ff66dfb8f-blh7h   1/1     Running       0          23h

NAME                    DESIRED   CURRENT   READY   UP-TO-DATE   AVAILABLE   NODE SELECTOR   AGE
daemonset.apps/restic   3         3         3       3            3           <none>          23h

NAME                     READY   UP-TO-DATE   AVAILABLE   AGE
deployment.apps/velero   1/1     1            1           23h

NAME                                DESIRED   CURRENT   READY   AGE
replicaset.apps/velero-6ff66dfb8f   1         1         1       23h

测试

1
2
git clone https://github.com/vmware-tanzu/velero.git
cd velero

不带PV备份

1
2
3
4
5
6
7
8
9
10
# nginx
kubectl apply -f examples/nginx-app/base.yaml
# 创建backup
velero backup create nginx-backup --include-namespaces nginx-example

# 模拟灾难
kubectl delete namespaces nginx-example

# 恢复
velero restore create --from-backup nginx-backup

带pv备份

example.yaml

1
2
3
4
5
6
7
8
9
10
11
12
13
14
15
16
17
18
19
20
21
22
23
24
25
26
27
28
29
30
31
32
33
34
35
36
37
38
39
40
41
42
43
44
45
46
47
48
49
50
51
52
53
54
55
56
57
58
59
apiVersion: v1
kind: Namespace
metadata:
  name: velero-example
  labels:
    app: mysql

---
apiVersion: v1
kind: PersistentVolumeClaim
metadata:
  namespace: velero-example
  name: mysql-pv-claim
  labels:
    app: mysql
spec:
  storageClassName: nfs-client
  accessModes:
    - ReadWriteOnce
  resources:
    requests:
      storage: 1Gi
---

apiVersion: apps/v1
kind: Deployment
metadata:
  namespace: velero-example
  name: mysql
  labels:
    app: mysql
spec:
  selector:
    matchLabels:
      app: mysql
  template:
    metadata:
      labels:
        app: mysql
    spec:
      containers:
      - image: mysql:5.7
        name: mysql
        env:
        - name: MYSQL_ROOT_PASSWORD
          value: "root"
        livenessProbe:
          tcpSocket:
            port: 3306
        ports:
        - containerPort: 3306
          name: mysql
        volumeMounts:
        - name: mysql-persistent-storage
          mountPath: /var/lib/mysql
      volumes:
      - name: mysql-persistent-storage
        persistentVolumeClaim:
          claimName: mysql-pv-claim

执行

1
2
3
4
5
6
7
8
9
10
11
12
13
14
15
16
17
18
19
20
21
22
23
24
25
26
kubectl apply -f example.yaml


# 创建数据库  进去用户密码都是root
kubectl exec -it -n mysql-backup [mysql-pod-name] -- /bin/bash

mysql -uroot -p
create database test;


# 创建backup
velero backup create mysql-backup --include-namespaces velero-example --default-volumes-to-restic=true

# 模拟灾难
kubectl delete namespaces velero-example
# 恢复
velero restore create --from-backup mysql-backup


# 检查数据库  进去用户密码都是root
kubectl exec -it -n mysql-backup [mysql-pod-name] -- /bin/bash

mysql -uroot -p
show databases;


api测试

资源过滤解析

backup

1
2
3
4
5
6
7
8
9
10
apiVersion: velero.io/v1
kind: Backup
metadata:
  name: nginx-backup-volume
  namespace: velero
spec:
  includedNamespaces:
    - "nginx-example"
	# back up pv 时候才需要
  defaultVolumesToRestic: true

restore

1
2
3
4
5
6
7
8
9
apiVersion: velero.io/v1
kind: Restore
metadata:
  name: nginx-backup-volume
  namespace: velero
spec:
  backupName: nginx-backup-volume
  includedNamespaces:
    - "nginx-example"

为了安全,同一个集群中要删除资源已备份资源,才能正常地恢复不然会跳过