rsync sersync

rsync

what

Rsync是一款开源的、快速的、多功能的、可实现全量及增量的本地或远程数据同步备份的优秀工具。Rstync软件适用于unix/linux/windows等多种操作系统平台。

Rsync英文全称为Remotesynchronization,即远程同步。从软件的名称就可以看出来,Rsync具有可使本地和远程两台主机之间的数据快速复制同步镜像、远程备份的功能,这个功能类似ssh带的scp命令,但又优于scp命令的功能,scp每次都是全量拷贝,而rsync可以增量拷贝。当然,Rsync还可以在本地主机的不通分区或目录之间全量及增量的复制数据,这又类似cp命令,但同样也优于cp命令,cp每次都是全量拷贝,而rsync可以增量拷贝。此外,利用Rsync还可以实现删除文件和目录功能,这又相当于rm命令。

一个rsync相当于scp,cp,rm,并且优于他们每一个命令。

在同步备份数据时,默认情况下,Rsync通过其独特的”quick check”算法,它仅同步大小或者最后修改时间发生变化的文件或目录,当然也可以根据权限,属主等属性的变化同步,但需要制定相应的参数,甚至可以实现只同步一个文件里有变化的内容部分,所以,可以实现快速的同步备份数据。一边对比差异,一边对差异的部分进行同步。

特性

它的特性如下:

  1. 可以镜像保存整个目录树和文件系统
  2. 可以很容易做到保持原来文件的权限、时间、软硬链接等等
  3. 无须特殊权限即可安装
  4. 优化的流程,文件传输效率高
  5. 可以使用 rsh、ssh 等方式来传输文件,当然也可以通过直接的 socket 连接
  6. 支持匿名传输

在使用 rsync 进行远程同步时,可以使用两种方式:远程 Shell 方式(用户验证由 ssh 负责)和 C/S 方式(即客户连接远程 rsync 服务器,用户验证由 rsync 服务器负责)。

无论本地同步目录还是远程同步数据,首次运行时将会把全部文件拷贝一次,以后再运行时将只拷贝有变化的文件(对于新文件)或文件的变化部分(对于原有文件)。

需要注意拷贝的时候源目录加“/”和不加“/”的区别(加“/”表示只拷贝该目录之下的文件;不加“/”表示连该目录一起拷贝)

常用参数

man rsync 翻译

1
2
3
4
5
6
7
8
9
10
11
12
13
14
15
16
17
18
19
20
21
22
23
24
25
-v : 展示详细的同步信息 
-a : 归档模式,相当于 -rlptgoD (以递归方式传输文件,并保持所有文件属性)
    -r : 递归目录 
    -l : 同步软连接文件 
    -p : 保留权限 
    -t : 将源文件的 < span class="string">"modify time" 同步到目标机器 
    -g : 保持文件属组 
    -o : 保持文件属主 
    -D : 和 --devices --specials 一样,保持设备文件和特殊文件 
-z : 发送数据前,先压缩再传输
-P same as --partial --progress
    --partial : 支持断点续传 
    --progress : 展示传输的进度
-n : 进行试运行,不作任何更改
-r,--recursive : 对子目录以递归模式,即目录下所有目录有同样传输
# 远程 Shell 方式 
rsync [OPTION]... SRC [SRC]... [USER@]HOST:DEST # 执行 “推” 操作 
or   rsync [OPTION]... [USER@]HOST:SRC [DEST]   # 执行 “拉” 操作 

# 远程 C/S 方式 
rsync [OPTION]... SRC [SRC]... [USER@]HOST::DEST                    # 执行 “推” 操作 
or   rsync [OPTION]... SRC [SRC]... rsync://[USER@]HOST[:PORT]/DEST # 执行 “推” 操作 
or   rsync [OPTION]... [USER@]HOST::SRC [DEST]                      # 执行 “拉” 操作 
or   rsync [OPTION]... rsync://[USER@]HOST[:PORT]/SRC [DEST]        # 执行 “拉” 操作 

Daemon 模式

Daemon,即守护进程。该模式是在一台rsync服务器上安装并运行一个rsync的服务进程,其他的客户端通过rsync命令上传文件到服务器中。该模式是rsync最常用的功能,用来做数据的定时或者实时备份

准备

1
2
3
4
5
6
# 设置同步目录所有权
chown -R nfsnobody:nfsnobody /data/nfs/
# 生成认证文件 用户名:密码
echo 'nfsuser:nfsuser123' > /etc/rsync_salve.pass
chmod 600 /etc/rsync_salve.pass

修改 /etc/rsyncd.conf 配置详解

1
2
3
4
5
6
7
8
9
10
11
12
13
14
15
16
17
18
19
20
21
22
23
24
25
26
27
28
# 传输文件使用的用户和用户组,如果是从服务器 => 客户端,要保证 www 用户对文件有读取的权限;如果是从客户端 => 服务端,要保证 www 对文件有写权限。
uid = nfsnobody
gid = nfsnobody
port = 873
# pid 文件路径
pid file = /var/rsyncd.pid
# 指定日志文件 
log file = /var/log/rsyncd.log
# 允许 chroot,提升安全性,客户端连接模块,首先 chroot 到模块 path 参数指定的目录下,chroot 为 yes 时必须使用 root 权限,且不能备份 path 路径外的链接文件
use chroot = no
# 允许的客户端最大连接数 
max connections = 200
# 设置不需要压缩的文件 
dont compress   = *.gz *.tgz *.zip *.z *.Z *.rpm *.deb *.bz2

read only = false
list = false
fake super = yes
ignore errors
[data]
# 模块备份数据路径
path = /data/nfs
# 模块验证的用户名称,可使用空格或者逗号隔开多个用户名 
auth users = nfsuser
# 模块验证密码文件 可放在全局配置里
secrets file = /etc/rsync_master.pass
# 填写client端IP 设定白名单,可以指定 IP 段(172.18.50.1/255.255.255.0), 各个 Ip 段用空格分开 
hosts allow = 10.xx.xx.93 10.xx.xx.91

启动服务

1
2
3
4
5
6
rsync --daemon --config=/etc/rsyncd.conf 
 
echo '/usr/bin/rsync --daemon' >> /etc/rc.local

systemctl start rsyncd
systemctl enable rsyncd

客户端测试

1
2
3
4
5
6
7
chown -R nfsnobody:nfsnobody /data/nfs/
echo "nfsuser123" > /etc/rsync.pass
chmod 600 /etc/rsync.pass
#创建测试文件,测试推送
cd /data/nfs
echo "This is test file" > file.txt
rsync -arv /data/nfs/ nfsuser@[rsync server ip]::data --password-file=/etc/rsync.pass

rsync 常见错误

1
2
rsync: failed to connect to 192.168.205.135 (192.168.205.135): No route to host (113)
rsync error: error in socket IO (code 10) at clientserver.c(125) [Receiver=3.1.2]

解决:防火墙问题,放行端口或直接关闭

1
2
@ERROR: auth failed on module rsync_test
rsync error: error starting client-server protocol (code 5) at main.c(1648) [Receiver=3.1.2]

解决:用户名与密码问题或模块问题,检查用户名与密码是否匹配,服务器端模块是否存在

1
2
rsync: read error: Connection reset by peer (104)
rsync error: error in rsync protocol data stream (code 12) at io.c(759) [Receiver=3.1.2]

解决:服务器端配置文件 /etc/rsyncd.conf 问题,检查配置文件参数是否出错
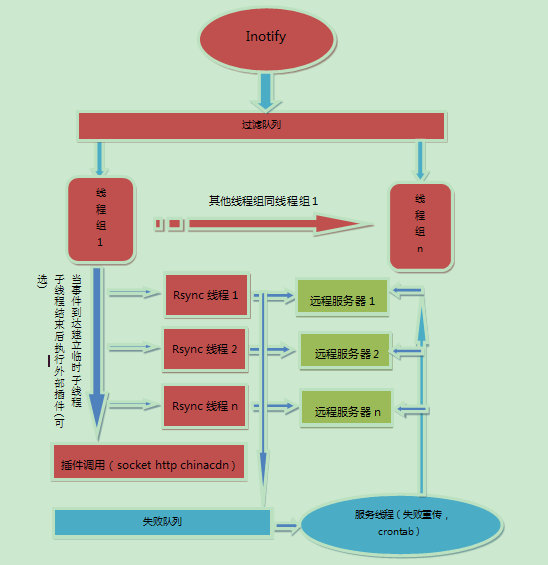
sersync

what

Synchronize files and folders between servers -using inotiy and rsync with c++ 服务器实时同步文件,服务器镜像解决方案

img

可以安装在client端实现自动同步

install

https://code.google.com/archive/p/sersync/downloads

1
2
3
4
5
# 下载sersync,如果连不了网,先可下载后再上传
wget https://dl.qiyuesuo.com/private/nfs/sersync2.5.4_64bit_binary_stable_final.tar.gz
tar xvf sersync2.5.4_64bit_binary_stable_final.tar.gz
mv GNU-Linux-x86/ /usr/local/sersync
cd /usr/local/sersync

修改/usr/local/sersync/confxml.xml

1
2
3
4
5
6
7
8
9
10
11
12
13
14
15
16
17
18
19
20
21
22
23
24
25
26
27
28
29
30
31
32
33
34
35
36
37
38
39
40
41
42
43
44
45
46
47
48
49
50
51
52
53
54
55
56
57
58
59
60
61
62
63
64
65
66
<?xml version="1.0" encoding="ISO-8859-1"?>
<head version="2.5">
    <host hostip="localhost" port="8008"></host>
    <debug start="false"/> <!--如果不开启此项,在删除监控目录下的文件时,目标服务器的文件则不会同时删除,根据需求开启-->
    <fileSystem xfs="false"/>
    <filter start="false">
        <exclude expression="(.*)\.svn"></exclude>
        <exclude expression="(.*)\.gz"></exclude>
        <exclude expression="^info/*"></exclude>
        <exclude expression="^static/*"></exclude>
    </filter>
    <inotify>
        <delete start="false"/>
        <createFolder start="true"/>
        <createFile start="false"/>
        <closeWrite start="true"/>
        <moveFrom start="true"/>
        <moveTo start="true"/>
        <attrib start="false"/>
        <modify start="false"/>
    </inotify>

    <sersync>
        <localpath watch="/data/nfs"><!--同步路径-->
            <remote ip="10.81.25.13" name="data"/> <!--同步服务器IP-->
            <!--<remote ip="192.168.8.39" name="tongbu"/>-->
            <!--<remote ip="192.168.8.40" name="tongbu"/>-->
        </localpath>
        <rsync>
            <commonParams params="-az"/> <!--rsnyc 命令参数-->
            <auth start="true" users="nfsuser" passwordfile="/etc/rsync.pass"/> <!--是否开启rsync的认证模式,需要配置users及passwordfile,根据情况开启(如果开启,注意密码文件权限一定要是600-->
            <userDefinedPort start="false" port="874"/><!-- port=874 -->
            <timeout start="true" time="100"/><!-- 是否开启rsync的超时时间 -->
            <ssh start="false"/>
        </rsync>
        <failLog path="/tmp/rsync_fail_log.sh" timeToExecute="60"/><!--default every 60mins execute once-->
        <crontab start="false" schedule="600"><!--600mins-->
            <crontabfilter start="false">
                <exclude expression="*.php"></exclude>
                <exclude expression="info/*"></exclude>
            </crontabfilter>
        </crontab>
        <plugin start="false" name="command"/>
    </sersync>

    <plugin name="command">
        <param prefix="/bin/sh" suffix="" ignoreError="true"/>  <!--prefix /opt/tongbu/mmm.sh suffix-->
        <filter start="false">
            <include expression="(.*)\.php"/>
            <include expression="(.*)\.sh"/>
        </filter>
    </plugin>

    <plugin name="socket">
        <localpath watch="/opt/tongbu">
            <deshost ip="192.168.138.20" port="8009"/>
        </localpath>
    </plugin>
    <plugin name="refreshCDN">
        <localpath watch="/data0/htdocs/cms.xoyo.com/site/">
            <cdninfo domainname="ccms.chinacache.com" port="80" username="xxxx" passwd="xxxx"/>
            <sendurl base="http://pic.xoyo.com/cms"/>
            <regexurl regex="false" match="cms.xoyo.com/site([/a-zA-Z0-9]*).xoyo.com/images"/>
        </localpath>
    </plugin>
</head>

启动

1
2
3
4
5
6
-d: 启用守护进程模式
-r: 在监控前,将监控目录与远程主机用 rsync 命令推送一遍
-n: 指定开启守护线程的数量,默认为 10 个
-o: 指定配置文件,默认使用 confxml.xml 文件

/usr/local/sersync/sersync2 -dro /usr/local/sersync/confxml.xml

测试是否成功

1
2
3
4
# 在 client 中的/data/nfs 目录创建文件
touch test

# 看 server 中的/data/nfs 是否有该文件  同步有点慢