环境
虚拟机ubuntu20.04,加载XDP程序报错。暂时使用docker建立开发环境 eBPF for mac
1 | |
1 | |
docker run
1 | |
Docker公司在后面提出了CNM(Container Network Model,可译为容器网络模型)规范,并将网络功能独立出来作为一个组件,即Libnetwork网络库。
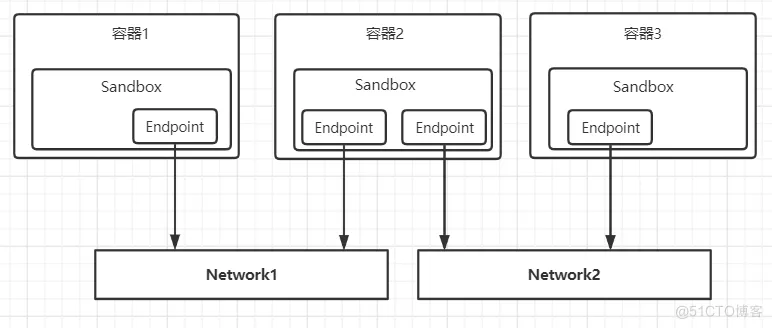
Libnetwork的设计遵循着CNM规范,在该规范中包含着三个重要概念:Sandbox(沙盒)、Endpoint(端点)和 Network(网络)。
-
Sandbox
Sandbox可以看成是在容器中独立的网络空间,在里面包含了容器的网络栈配置,包括网络接口、路由表和DNS设置等。Sandbox的标准实现基于Linux中的Network Namespace特性。一个Sandbox可以包含多个Endpoint,并且连接到不同的网络中。
-
Endpoint
Endpoint通常由一对Veth Pair(成对出现的一种虚拟网络设备接口)组成,其中一端在Sandbox中,另一端连接到网络中。
-
Network
可以连接多个Endpoint的一个子网
操作docker namsepace,找到docker容器在主机侧的veth pair网卡
1 | |
通过容器的主进程 ID,关联
1 | |
XDP
XDP全称为eXpress Data Path,是Linux内核网络栈的最底层。它只存在于RX路径上,允许在网络设备驱动内部网络堆栈中数据来源最早的地方进行数据包处理,在特定模式下可以在操作系统分配内存(skb)之前就已经完成处理。
XDP暴露了一个可以加载BPF程序的网络钩子。在这个钩子中,程序能够对传入的数据包进行任意修改和快速决策,避免了内核内部处理带来的额外开销。这使得XDP在性能速度方面成为最佳钩子
XDP输入参数
XDP暴露的钩子具有特定的输入上下文,它是单一输入参数。它的类型为 struct xdp_md,在内核头文件bpf.h 中定义,具体字段如下所示:
1 | |
程序执行时,data和data_end字段分别是数据包开始和结束的指针,它们是用来获取和解析传来的数据,第三个值是data_meta指针,初始阶段它是一个空闲的内存地址,供XDP程序与其他层交换数据包元数据时使用。最后两个字段分别是接收数据包的接口和对应的RX队列的索引。当访问这两个值时,BPF代码会在内核内部重写,以访问实际持有这些值的内核结构struct xdp_rxq_info。
1 | |
XDP输出参数
在处理完一个数据包后,XDP程序会返回一个动作(Action)作为输出,它代表了程序退出后对数据包应该做什么样的最终裁决,也是在内核头文件bpf.h 定义了以下5种动作类型:
1 | |
可以看出这个动作的本质是一个int值。前面4个动作是不需要参数的,最后一个动作需要额外指定一个NIC网络设备名称,作为转发这个数据包的目的地。
引入XDP之后网络Data Path
启用XDP后,网络包传输路径是这样的 NIC network interface controller 网卡
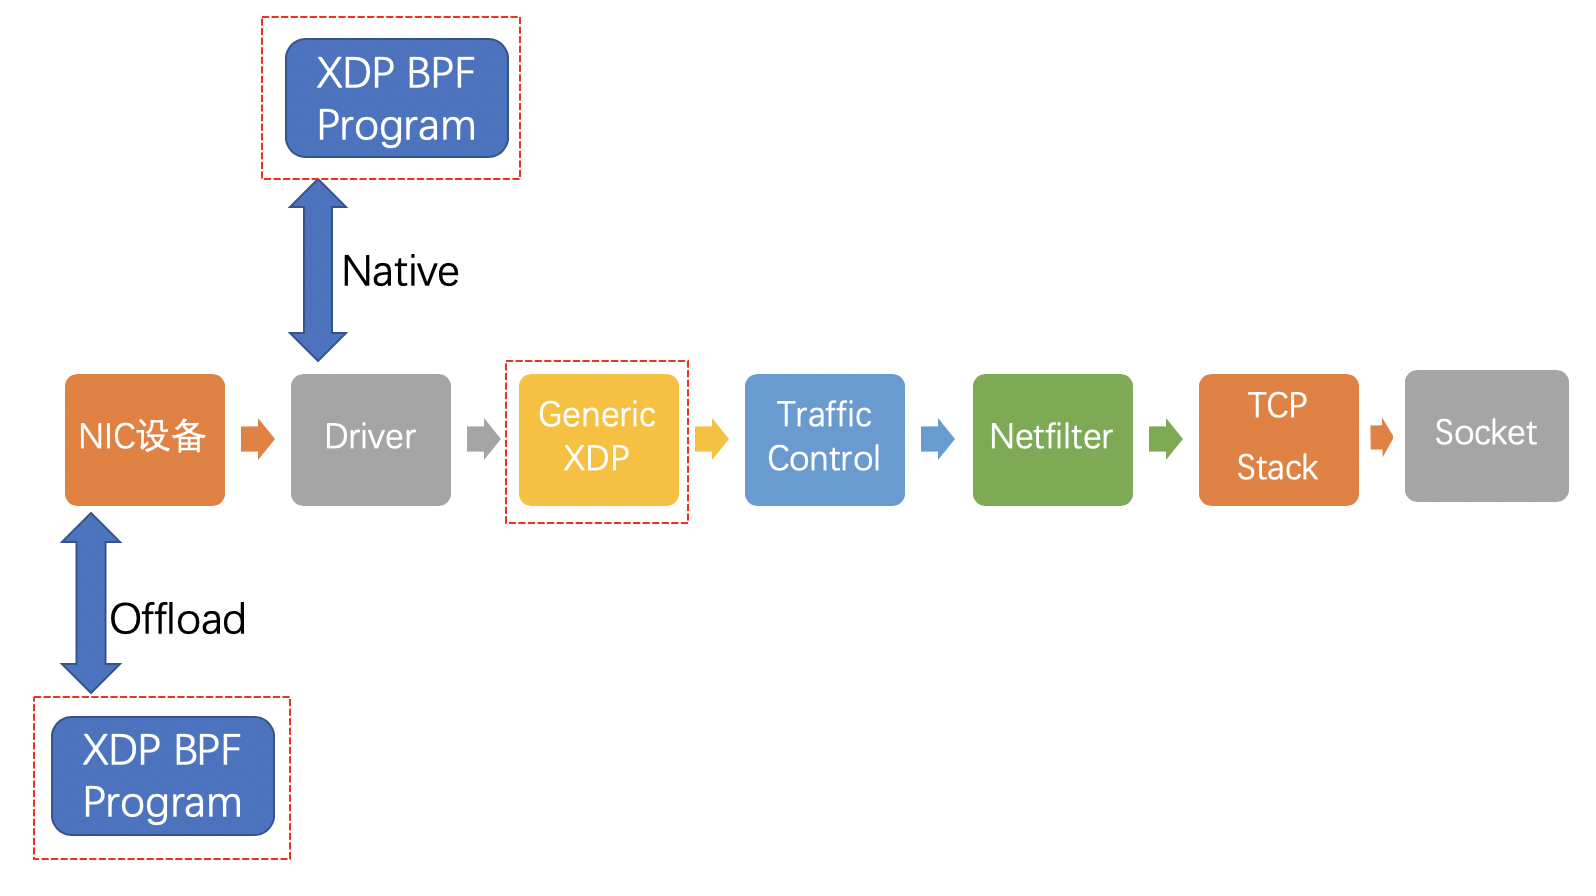
可以看到多了3个红色方框圈起来的新链路,我们来一一介绍:
- offload模式,XDP程序直接hook到可编程网卡硬件设备上,与其他两种模式相比,它的处理性能最强;由于处于数据链路的最前端,过滤效率也是最高的。如果需要使用这种模式,需要在加载程序时明确声明。目前支持这种模式的网卡设备不多,有一家叫netronome。
- native模式,XDP程序hook到网络设备的驱动上,它是XDP最原始的模式,因为还是先于操作系统进行数据处理,它的执行性能还是很高的,当然你的网络驱动需要支持,目前已知的有i40e, nfp, mlx系列和ixgbe系列。
- generic模式,这是操作系统内核提供的通用 XDP兼容模式,它可以在没有硬件或驱动程序支持的主机上执行XDP程序。在这种模式下,XDP的执行是由操作系统本身来完成的,以模拟native模式执行。好处是,只要内核够高,人人都能玩XDP;缺点是由于是仿真执行,需要分配额外的套接字缓冲区(SKB),导致处理性能下降,跟native模式在10倍左右的差距。
1 | |
ELF全称是Executable and Linkable Format,就是可执行文件的一种主流格式(详细介绍点这里),广泛用于Linux系统,我们的BPF程序一旦通过编译后,也会是这种格式。下面代码中的SEC("xdp")和SEC("license")都是基于这个宏定义。
事实上,程序的执行入口可以由前面提到的ELF格式的对象文件中的Section来指定。入口也有默认值,它是ELF格式文件中.text这个标识的内容,程序编译时会将能看到的函数放到.text里面。
XDPdemo
编译XDP程序
1 | |
加载XDP程序
1 | |
测试程序
1 | |
TC
上面的测试场景是验证了经过目标网络设备的Ingress流量被我们的XDP程序drop了,专业术语叫RX流向。那么Egress流量是否也会被drop掉呢?
答案是,不会。XDP hook不会作用到Egress流量,也就是TX流向。读者可以自行在已经attach XDP程序的实验环境中,ping一个外部地址,请保证这次请求会经过被attach XDP程序的网络设备。其结果就是请求没有收到任何影响。
那么谁能帮我们解决Egress流量控制的问题呢?那就是TC。
能处理入站流量(正在接收的数据包)。为了处理出站流量(传输数据包出去),我们可以使用Traffic Control,简称TC,它是离网卡最近的可以控制全部流向的控制层。
介绍
TC全称「Traffic Control」,直译过来是「流量控制」,在这个领域,你可能更熟悉的是Linux iptables或者netfilter,它们都能做packet mangling,而TC更专注于packet scheduler,所谓的网络包调度器,调度网络包的延迟、丢失、传输顺序和速度控制。
使用并配置TC,为用户带来了对于网络包的可预测性,减少对于网络资源的争夺,实现对不同优先等级的网络服务分配网络资源(如带宽),达到互不干扰的目的,因此服务质量(QoS)一词经常被用作TC的代名词。
配置复杂性成为使用TC最显著的缺点,如果配置TC得当,可以使网络资源分配更加公平。但一旦它以不恰当的方式配置使用,可能会导致资源的进一步争夺。因此相比学习如何正确配置TC,很多IT企业可能会倾向购买更高的带宽资源,
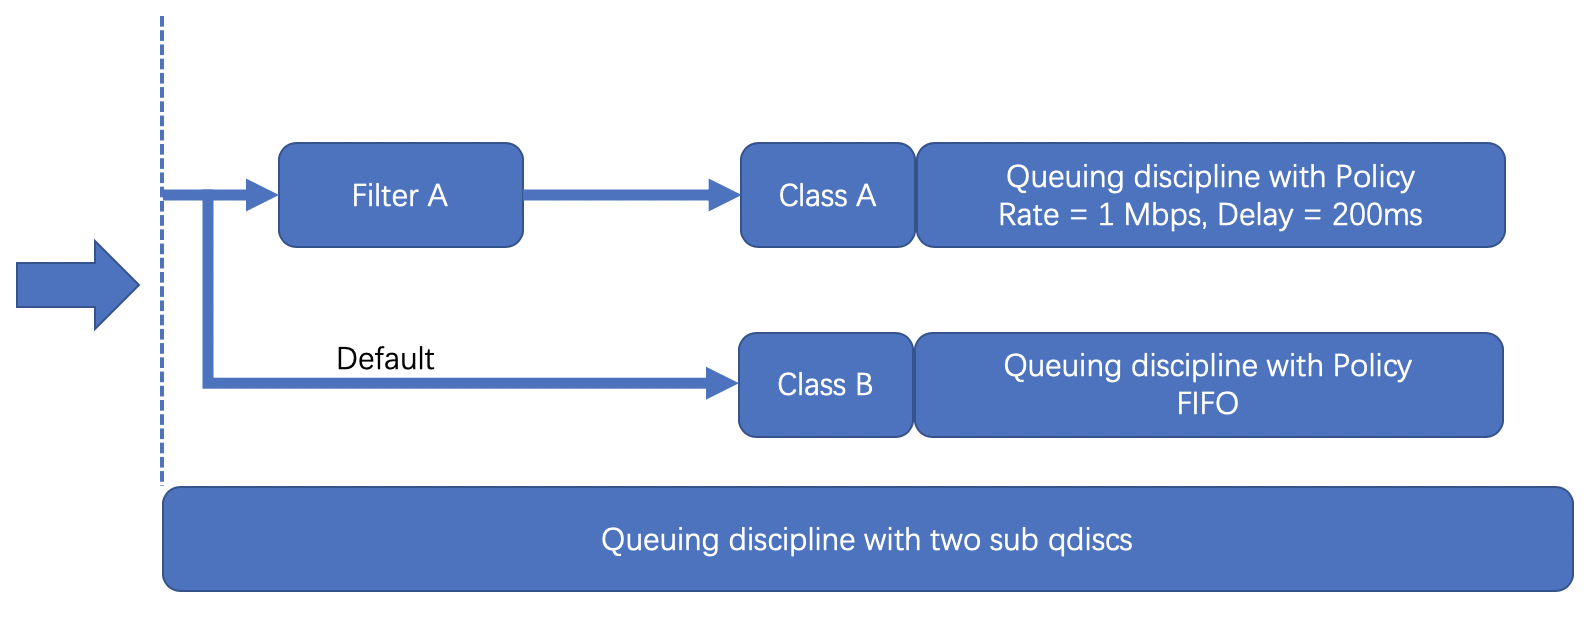
调度结构
- Queuing disciplines,简称为qdisc,直译是「队列规则」,它的本质是一个带有算法的队列,默认的算法是FIFO,形成了一个最简单的流量调度器。
- Class,直译是「种类」,它的本质是为上面的qdisc进行分类。因为现实情况下会有很多qdisc存在,每种qdisc有它特殊的职责,根据职责的不同,可以对qdisc进行分类。
- Filters,直译是「过滤器」,它是用来过滤传入的网络包,使它们进入到对应class的qdisc中去。
- Policers,直译是「规则器」,它其实是filter的跟班,通常会紧跟着filter出现,定义命中filter后网络包的后继操作,如丢弃、延迟或限速。
TC的调度结构远不止这么简单,大家感兴趣可以到这里看看更为详细的介绍。
那么TC是怎么和BPF联系在一起的呢?
从内核4.1版本起,引入了一个特殊的qdisc,叫做clsact,它为TC提供了一个可以加载BPF程序的入口,使TC和XDP一样,成为一个可以加载BPF程序的网络钩子。
TC vs XDP
这两个钩子都可以用于相同的应用场景,如DDoS缓解、隧道、处理链路层信息等。但是,由于XDP在任何套接字缓冲区(SKB)分配之前运行,所以它可以达到比TC上的程序更高的吞吐量值。然而,后者可以从通过 struct __sk_buff 提供的额外的解析数据中受益,并且可以执行 BPF 程序,对入站流量和出站流量都可以执行 BPF 程序,是 TX 链路上的能被操控的第一层。
TC 输入参数
TC接受单个输入参数,类型为struct __sk_buff。这个结构是一种UAPI(user space API of the kernel),允许访问内核中socket buffer内部数据结构中的某些字段。它具有与 struct xdp_md 相同意义两个指针,data和data_end,同时还有更多信息可以获取,这是因为在TC层面上,内核已经解析了数据包以提取与协议相关的元数据,因此传递给BPF程序的上下文信息更加丰富。结构 __sk_buff 的整个声明如下所说,可以在 include/uapi/linux/bpf.h 文件中看到,下面是结构体的定义,比XDP的要多出很多信息,这就是为什么说TC层的吞吐量要比XDP小了,因为实例化一堆信息需要很大的cost。
1 | |
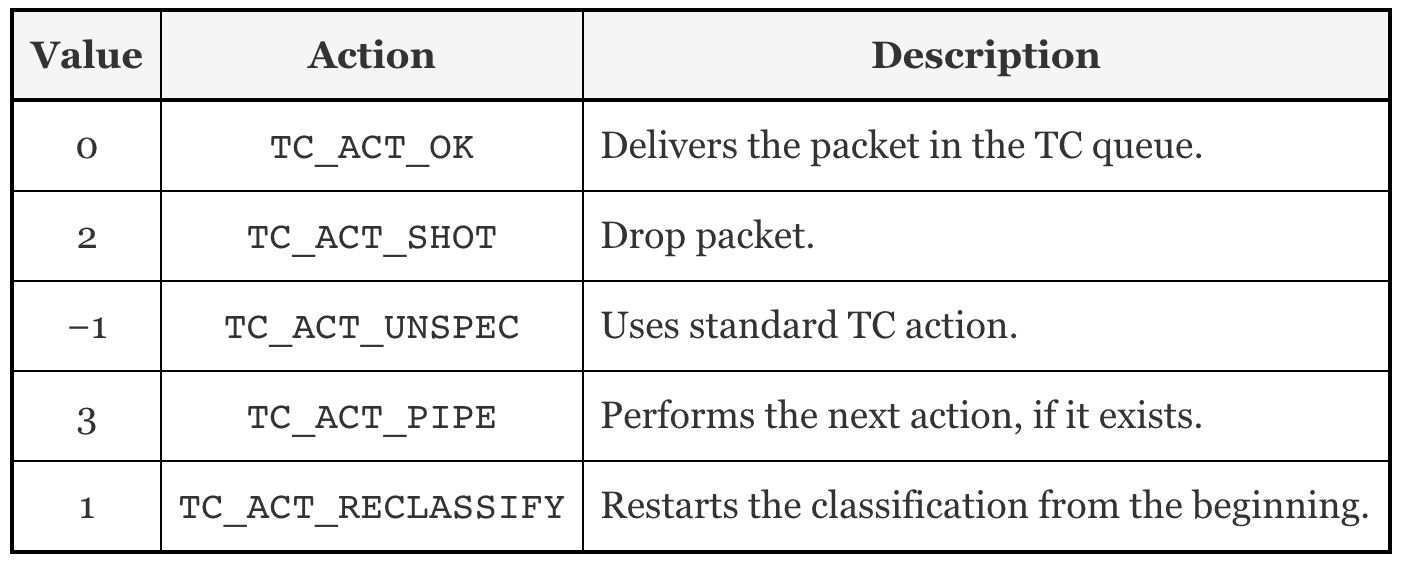
TC输出参数
和XDP一样,TC的输出代表了数据包如何被处置的一种动作。它的定义在include/uapi/linux/pkt_cls.h找到。最新的内核版本里定义了9种动作,其本质是int类型的值,以下是5种常用动作:
TC demo
上文提到的了TC控制的单元是qdisc,用来加载BPF程序是个特殊的qdisc 叫clsact,示例命令如下
1 | |
1 | |
编译 可以使用clang进行编译,不同之处是由于引用了本地头文件,所以需要加上-I参数,指定头文件所在目录
1 | |
TC和BPF亲密合作
刚刚用到了一个参数da,它的全称是「direct action」。其实它是TC支持BPF后的「亲密合作」的产物。
对于tc filter来说,一般在命中过滤条件后需要指定下一步操作动作,如:
1 | |
注意到这个tc filter后面跟了一个action drop,意思是命中过滤条件后将网络包丢弃,而这个操作动作如果我们使用BPF程序,其实就是已经定义在程序里了。为了避免重复指定,内核引入了da模式,告诉TC请repect BPF程序提供的返回值,无需再手动指定action了,节省了调用action模块的开销,这也是目前TC with BPF的推荐做法。这篇文章对此作了详细介绍。
调试
-
添加调试日志,打印通过目标网卡网络包的源地址(source address)和目标地址(destination address),观察是否符合现实情况;
-
单步调试,在加载到内核的BPF程序加断点(breakpoint),一旦被触发时,观察上下文的内容。
添加调试日志
第一种思路理论上是比较容易实现的,就是在适当的位置添加printf函数,但由于这个函数需要在内核运行,而BPF中没有实现它,因此无法使用。事实上,BPF程序能的使用的C语言库数量有限,并且不支持调用外部库。
为了克服这个限制,最常用的一种方法是定义和使用BPF辅助函数,即helper function。比如可以使用bpf_trace_printk()辅助函数,这个函数可以根据用户定义的输出,将BPF程序产生的对应日志消息保存在用来跟踪内核的文件夹(/sys/kernel/debug/tracing/),这样,我们就可以通过这些日志信息,分析和发现BPF程序执行过程中可能出现的错误。
BPF默认定义的辅助函数有很多,它们都是非常有用的,可谓是「能玩转辅助函数,就能玩转BPF编程」。可以在这里找到全量的辅助函数清单。或者bpf-helpers-man
这个函数的入门使用方法和输出说明可以在这篇文章中找到,现在我们把它加到BPF程序里。
1 | |
开发cilium/ebpf
-
https://www.youtube.com/watch?v=eZp_3EjJdnA&ab_channel=MichaelMullin 视频
-
1
2
3
4
5sudo apt-get install -y clang llvm libelf-dev libpcap-dev gcc-multilib build-essential tcpdump linux-tools-common linux-tools-generic linux-headers-generic iproute2 golang-go bpftrace cp /usr/lib/linux-tools/5.19.0-38-generic/bpftool /usr/sbin/bpftool -
https://github.com/cilium/ebpf
获取需要hook函数参数的数据结构
https://github.com/iovisor/bcc/blob/master/docs/reference_guide.md#3-tracepoints
1 | |
c代码
1 | |
数据结构的大小写要注意
go代码
1 | |
c代码
1 | |
编译
bpf2go利用clang,compiles a C source file into eBPF bytecode,用go加载操作eBPF程序和map
1 | |
使用go generate自动执行命令,把bpf代码编译成字符数组,使得go可以调用
1 | |
注意大小写
1 | |
BPF文件系统
用于在程序之间共享BPF映射的机制称为固定(pinning)。这意味着我们为每个映射创建一个文件,并将其放置在一个特殊的文件系统下,该文件系统挂载在/sys/fs/bpf/ 下。如果没有挂载此文件系统,我们尝试固定BPF对象时将无法成功,因此需要确保它已挂载。
1 | |
If you followed the tutorial you will likely already have gotten this mounted without noticing. As both iproute2 ‘ip’ and our testenv will automatically mount it to the default location under /sys/fs/bpf/. If not, use the above command to mount it.