GPU节点 docker k8s 适配

NVIDIA准备

在每个工作节点上都安装 NVIDIA GPU 或 AMDGPU 驱动程序,如下所述 。 使用 NVIDIA GPU 的系统要求包括:

  • NVIDIA 驱动程序的版本为 384.81 及以上;
  • nvidia-docker 的版本为 2.0 及以上;
  • kubelet 配置的容器运行时 (Container Runtime) 必须为 Docker;
  • Docker 配置的默认运行时 (Default Runtime) 必须为 nvidia-container-runtime, 而不能用runc;
  • Kubernetes 版本为 1.11 及以上 。

  • 检查系统要求

参考预安装操作

1
2
3
4
5
6
7
8
9
10
11
# Verify You Have a CUDA-Capable GPU
lspci | grep -i nvidia

# Verify You Have a Supported Version of Linux
uname -m && cat /etc/*release

# Verify the System Has gcc Installed
gcc --version

# Verify the System has the Correct Kernel Headers and Development Packages Installed
uname -r

NVIDIA 12.1 安装有网版

不要安装NVIDIA CUDA Toolkit (nvidia-container-toolkit) 下面已经安装好了

更新NVIDIA版本,ubuntu repo

其中$distro/$arch应替换为以下之一:

  • ubuntu1604/x86_64
  • ubuntu1804/cross-linux-sbsa
  • ubuntu1804/ppc64el
  • ubuntu1804/sbsa
  • ubuntu1804/x86_64
  • ubuntu2004/cross-linux-sbsa
  • ubuntu2004/sbsa
  • ubuntu2004/x86_64
  • ubuntu2204/sbsa
  • ubuntu2204/x86_64
1
2
3
# 安装新的 cuda-keyring 包
wget https://developer.download.nvidia.com/compute/cuda/repos/$distro/$arch/cuda-keyring_1.0-1_all.deb
sudo dpkg -i cuda-keyring_1.0-1_all.deb

或者

1
2
3
4
5
6
7
8
9
# 手动注册新的签名密钥
wget https://developer.download.nvidia.com/compute/cuda/repos/<distro>/<arch>/cuda-<distro>-keyring.gpg
sudo mv cuda-<distro>-keyring.gpg /usr/share/keyrings/cuda-archive-keyring.gpg
# 启用网络存储库
echo "deb [signed-by=/usr/share/keyrings/cuda-archive-keyring.gpg] https://developer.download.nvidia.com/compute/cuda/repos/<distro>/<arch>/ /" | sudo tee /etc/apt/sources.list.d/cuda-<distro>-<arch>.list

# 添加 pin 文件以优先考虑 CUDA 存储库
wget https://developer.download.nvidia.com/compute/cuda/repos/<distro>/<arch>/cuda-<distro>.pin
sudo mv cuda-<distro>.pin /etc/apt/preferences.d/cuda-repository-pin-600
1
2
3
4
5
6
7
sudo apt-get update
sudo apt-get install cuda
sudo reboot

export PATH=/usr/local/cuda-12.0/bin${PATH:+:${PATH}}
export LD_LIBRARY_PATH=/usr/local/cuda-12.0/lib64\
                         ${LD_LIBRARY_PATH:+:${LD_LIBRARY_PATH}}

安装配置nvidia-container-runtime

NVIDIA Drivers

docker环境部署参考

检查驱动

检查驱动是否存在

使用nvcc -V检查驱动和cuda。

1
2
3
4
5
6
# 存在
vcc: NVIDIA (R) Cuda compiler driver
Copyright (c) 2005-2020 NVIDIA Corporation
Built on Wed_Jul_22_19:09:09_PDT_2020
Cuda compilation tools, release 11.0, V11.0.221
Build cuda_11.0_bu.TC445_37.28845127_0

然后nvidia-smi 有报错参考重新安装驱动
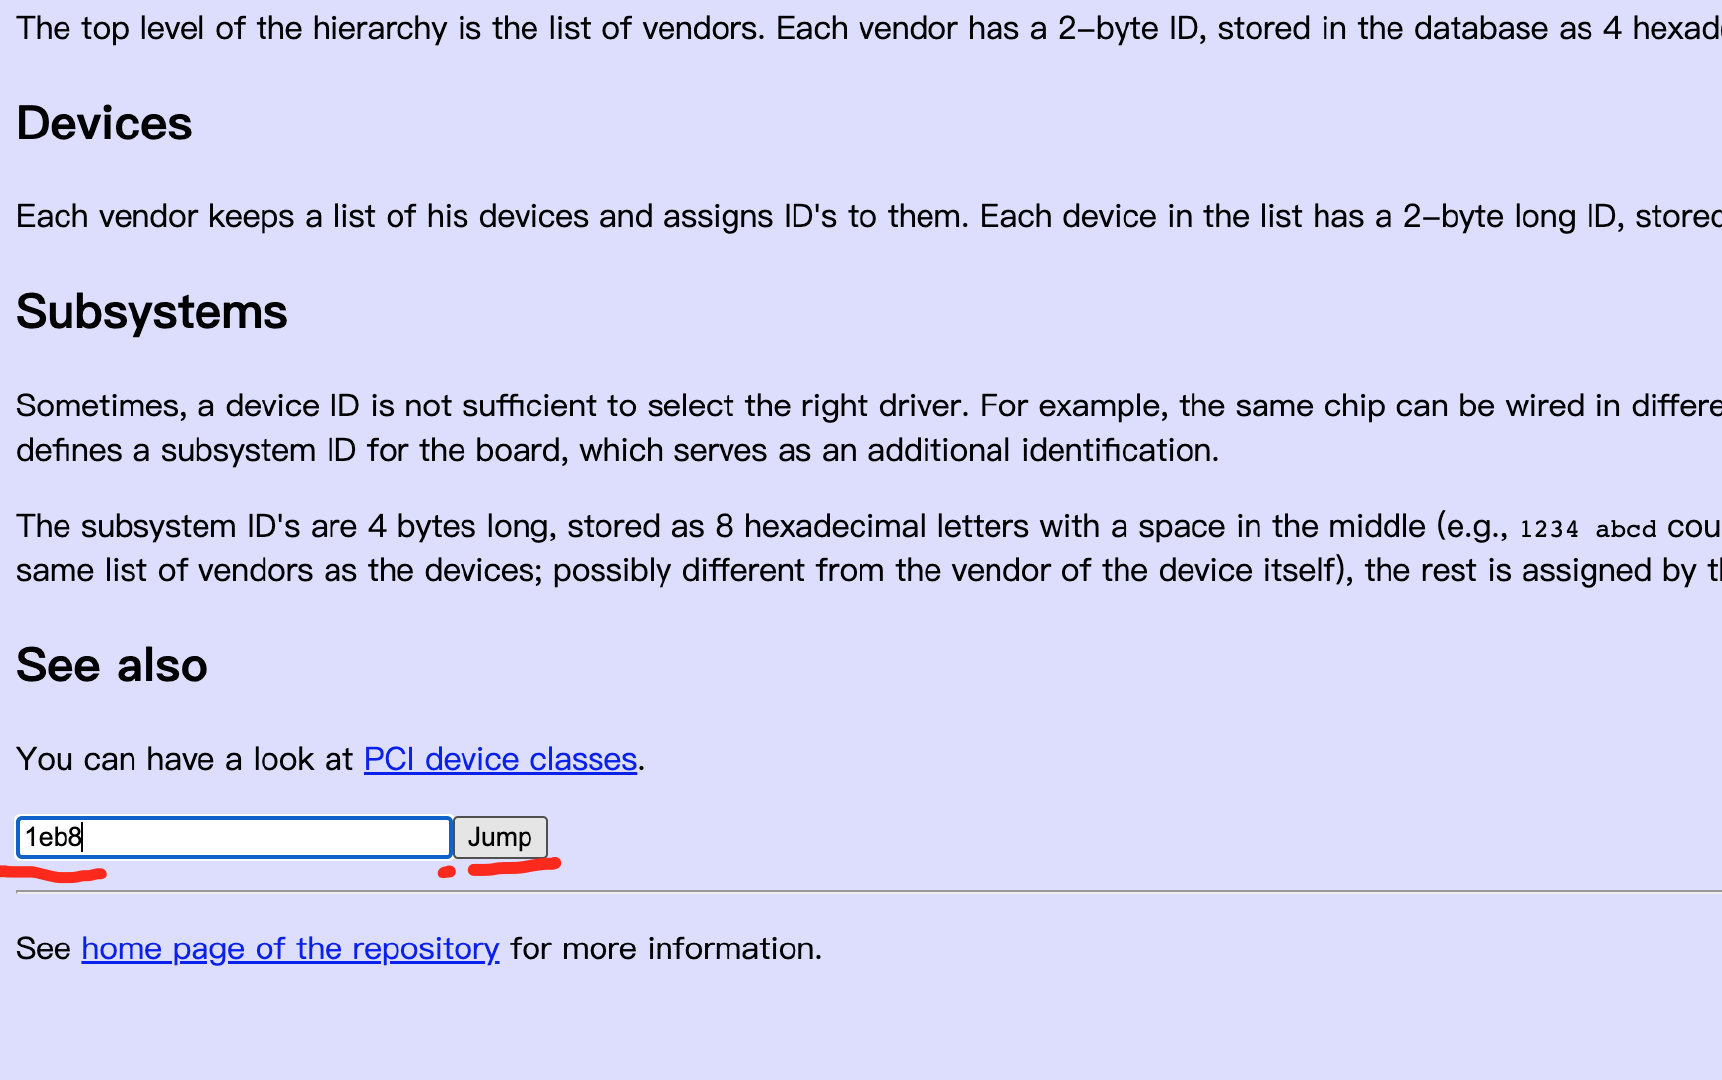
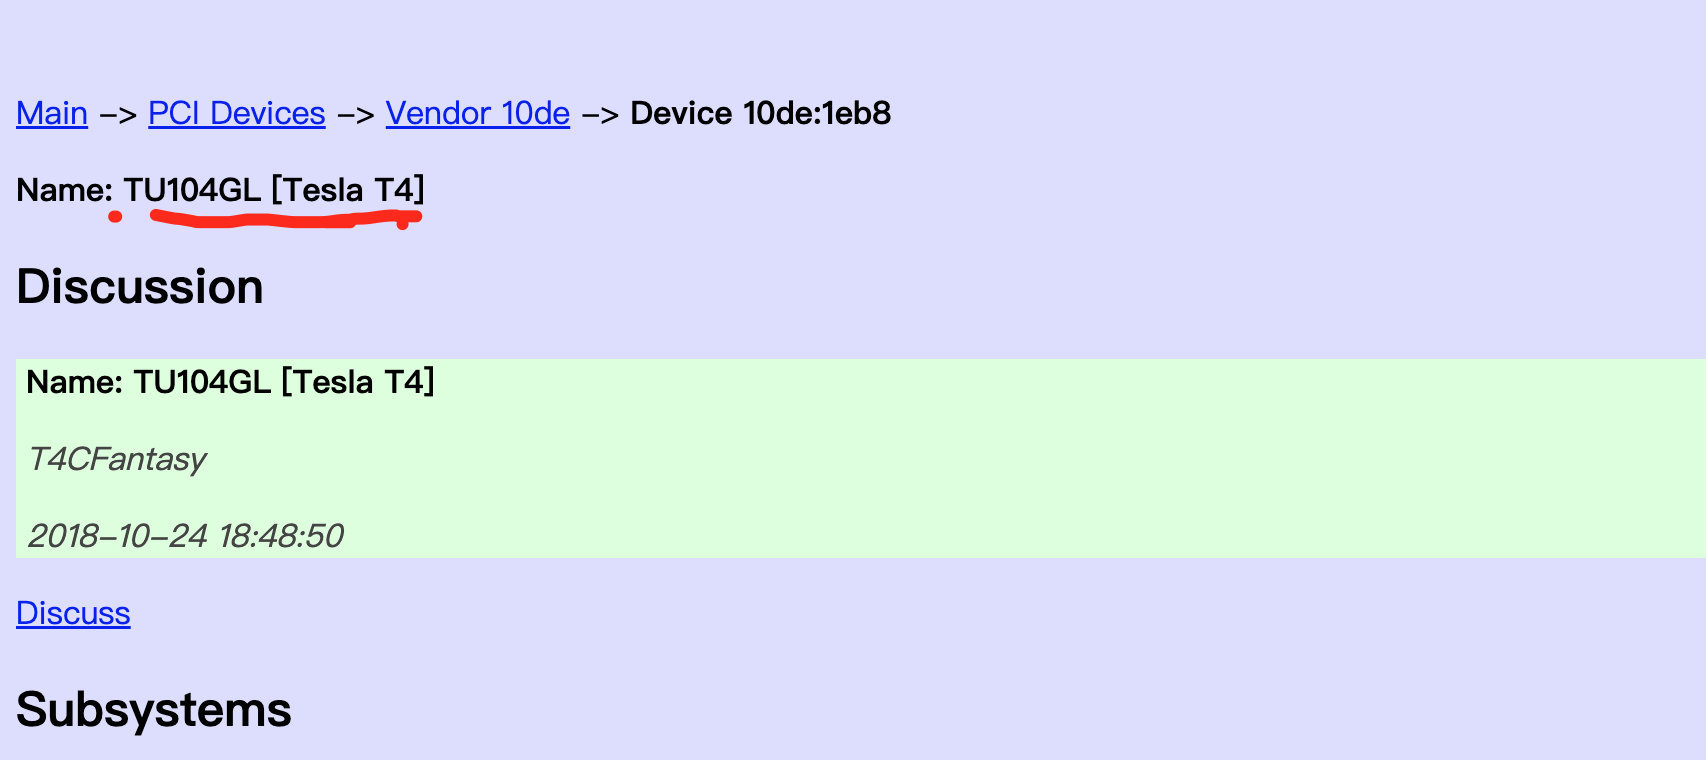
查看型号

1
2
3
4
5
lspci | grep -i nvidia


root@d-ecs-38357230:~# lspci | grep -i nvidia
00:08.0 3D controller: NVIDIA Corporation Device 1eb8 (rev a1)

返回一个1eb8,可以通过PCI devices查询

image-20220412105920629

image-20220412105957003

也可以直接安装NVIDIA CUDA Toolkit

The CUDA Toolkit contains the CUDA driver and tools needed to create, build and run a CUDA application as well as libraries, header files, and other resources.

根据 https://github.com/NVIDIA/nvidia-docker CUDA Toolkit不是必须的,驱动是必须的
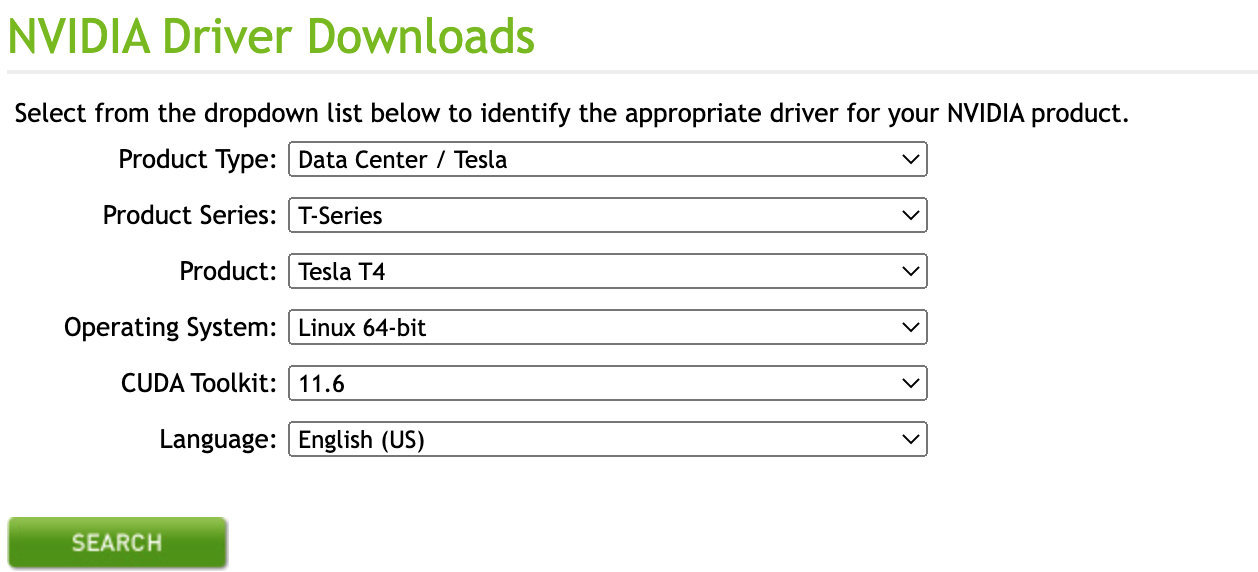
安装驱动

查看支持显卡的驱动最新版本及下载,下载之后是.run后缀 (可以直接下载驱动)

image-20220413095333085

1
sudo sh NVIDIA-Linux-x86_64-384.90.run -no-x-check -no-nouveau-check -no-opengl-files

代码注释:

-no-x-check #安装驱动时关闭X服务

-no-nouveau-check #安装驱动时禁用nouveau

-no-opengl-files #只安装驱动文件,不安装OpenGL文件

或者

1
2
3
4
5
6
7
8
9
更新软件源,运行
apt-get upgrade
apt-cache search nvidia-* |grep 455 查询455版本的驱动是否存在
nvidia-driver-418-server - NVIDIA Server Driver metapackage
nvidia-driver-440-server - NVIDIA Server Driver metapackage
nvidia-driver-450-server - NVIDIA Server Driver metapackage
nvidia-driver-455 - NVIDIA driver metapackage
安装 apt-get install nvidia-driver-455 -y
安装完reboot系统

查看cuda版本

1
2
root@d-ecs-38357230:~# cat /usr/local/cuda/version.txt
CUDA Version 11.0.228

查看显卡驱动版本

1
2
3
root@d-ecs-38357230:~# cat /proc/driver/nvidia/version
NVRM version: NVIDIA UNIX x86_64 Kernel Module  450.89  Thu Oct 22 20:49:26 UTC 2020
GCC version:  gcc version 7.5.0 (Ubuntu 7.5.0-3ubuntu1~18.04)

验证驱动

1
2
3
4
nvidia-smi -L (必须安装好nvidia驱动)

root@d-ecs-38357230:~# nvidia-smi -L
GPU 0: Tesla T4 (UUID: GPU-6b1d3e62-f94c-9236-1398-813bb48aab5a)

重新安装驱动

NVIDIA-SMI has failed because it couldn’t communicate with the NVIDIA driver. Make sure that the latest NVIDIA driver is installed and running.

运行nvidia-smi时,报错。

使用nvcc -V检查驱动和cuda。

1
2
3
4
nvcc: NVIDIA (R) Cuda compiler driver
Copyright (c) 2005-2018 NVIDIA Corporation
Built on Sat_Aug_25_21:08:01_CDT_2018
Cuda compilation tools, release 10.0, V10.0.130

发现驱动是存在的,于是进行下一步

查看已安装驱动的版本信息

1
2
ls /usr/src | grep nvidia
nvidia-450.57

重新安装

1
2
apt-get install dkms
dkms install -m nvidia -v 450.57

等待安装完成后,再次输入nvidia-smi,查看GPU使用状态

nvidia-docker2

/etc/docker/daemon.json,修改docker Runtime

1
2
3
4
5
6
7
8
9
{
    "default-runtime": "nvidia",
    "runtimes": {
        "nvidia": {
            "path": "/usr/bin/nvidia-container-runtime",
            "runtimeArgs": []
        }
    }
}

根据Setting up Docker 安装nvidia-docker2

Setup the package repository and the GPG key:

1
2
3
4
5
$ distribution=$(. /etc/os-release;echo $ID$VERSION_ID) \
      && curl -fsSL https://nvidia.github.io/libnvidia-container/gpgkey | sudo gpg --dearmor -o /usr/share/keyrings/nvidia-container-toolkit-keyring.gpg \
      && curl -s -L https://nvidia.github.io/libnvidia-container/$distribution/libnvidia-container.list | \
            sed 's#deb https://#deb [signed-by=/usr/share/keyrings/nvidia-container-toolkit-keyring.gpg] https://#g' | \
            sudo tee /etc/apt/sources.list.d/nvidia-container-toolkit.list

Install the nvidia-docker2 package (and dependencies) after updating the package listing:

1
$ sudo apt-get update
1
$ sudo apt-get install -y nvidia-docker2

Restart the Docker daemon to complete the installation after setting the default runtime:

1
systemctl daemon-reload && systemctl restart docker

At this point, a working setup can be tested by running a base CUDA container:

1
$ sudo docker run --rm --gpus all nvidia/cuda:11.0-base nvidia-smi

This should result in a console output shown below:

1
2
3
4
5
6
7
8
9
10
11
12
13
14
15
16
17
18
19
+-----------------------------------------------------------------------------+
| NVIDIA-SMI 450.51.06    Driver Version: 450.51.06    CUDA Version: 11.0     |
|-------------------------------+----------------------+----------------------+
| GPU  Name        Persistence-M| Bus-Id        Disp.A | Volatile Uncorr. ECC |
| Fan  Temp  Perf  Pwr:Usage/Cap|         Memory-Usage | GPU-Util  Compute M. |
|                               |                      |               MIG M. |
|===============================+======================+======================|
|   0  Tesla T4            On   | 00000000:00:1E.0 Off |                    0 |
| N/A   34C    P8     9W /  70W |      0MiB / 15109MiB |      0%      Default |
|                               |                      |                  N/A |
+-------------------------------+----------------------+----------------------+

+-----------------------------------------------------------------------------+
| Processes:                                                                  |
|  GPU   GI   CI        PID   Type   Process name                  GPU Memory |
|        ID   ID                                                   Usage      |
|=============================================================================|
|  No running processes found                                                 |
+-----------------------------------------------------------------------------+

注意事项

如果存在这种现象: “没有运行程序,nvidia-smi查看GPU-Util 达到100% GPU利用率很高” 需要把驱动模式设置为常驻内存才可以,设置命令:

nvidia-smi -pm 1

AliGPUShare

K8s + Nvidia-Device-Plugin的方式两个限制

  • 每一块GPU同时最多只能被一个容器使用(会造成巨大的资源浪费)
  • 没有考虑GPU卡之间的通道亲和性(因为不同的连接介质对卡与卡之间的数据传输速度影响非常大)

所以使用AliyunContainerService 提供Pod 之间共享 GPU解决方案

  • https://blog.csdn.net/u012751272/article/details/120566202?spm=1001.2014.3001.5502
  • https://github.com/AliyunContainerService/gpushare-scheduler-extender/blob/master/docs/install.md

配置调度器配置文件

Kubernetes v1.23 开始不再支持调度策略,而是应该使用调度程序配置。这意味着scheduler-policy-config.yaml需要包含在调度程序配置 ( /etc/kubernetes/manifests/kube-scheduler.yaml) 中。这是最终修改的kube-scheduler.yaml的示例

注意:如果您的 Kubernetes 默认调度程序部署为静态 pod,请不要编辑 /etc/kubernetes/manifest 中的 yaml 文件。您需要在/etc/kubernetes/manifest目录外编辑 yaml 文件。并将您编辑的yaml文件复制到’/etc/kubernetes/manifest/’目录,然后kubernetes会自动使用yaml文件更新默认的静态pod。

1
2
3
# 下载 调度器配置文件
cd /etc/kubernetes
curl -O https://raw.githubusercontent.com/AliyunContainerService/gpushare-scheduler-extender/master/config/scheduler-policy-config.yaml

因为结合rke,需要修改kubeconfig路径

1
2
3
4
5
6
7
8
9
10
11
12
13
14
15
---
apiVersion: kubescheduler.config.k8s.io/v1beta2
kind: KubeSchedulerConfiguration
clientConnection:
  kubeconfig: /etc/kubernetes/ssl/kubecfg-kube-scheduler.yaml # 根据rke scheduler kubeconfig路径
extenders:
- urlPrefix: "http://127.0.0.1:32766/gpushare-scheduler"
  filterVerb: filter
  bindVerb: bind
  enableHTTPS: false
  nodeCacheCapable: true
  managedResources:
  - name: aliyun.com/gpu-mem
    ignoredByScheduler: false
  ignorable: false

使用rke配置cluster.yml scheduler config

1
2
3
4
services:
    scheduler:
      extra_args:
        config: /etc/kubernetes/scheduler-policy-config.yaml

kube-scheduler容器启动,通过docker inspect kube-scheduler已经挂载了/etc/kubernetes,所以不用修改scheduler本身

1
2
3
4
5
6
7
8
9
"Mounts": [
            {
                "Type": "bind",
                "Source": "/etc/kubernetes",
                "Destination": "/etc/kubernetes",
                "Mode": "",
                "RW": true,
                "Propagation": "rprivate"
            },
1
2
# 更新配置
./rke up -config cluster.yml --ignore-docker-version

部署GPU共享调度扩展器

1
kubectl create -f https://raw.githubusercontent.com/AliyunContainerService/gpushare-scheduler-extender/master/config/gpushare-schd-extender.yaml

注意事项

  • 单节点需要修改gpushare-schd-extender.yaml,不然会0/1 nodes are available: 1 node(s) didn’t match Pod’s node affinity/selector. 参考

    1
    2
    3
    4
    5
    6
    7
    8
    9
    10
    11
        spec:
          hostNetwork: true
          tolerations:
    #      - effect: NoSchedule
    #        operator: Exists
    #        key: node-role.kubernetes.io/master
          - effect: NoSchedule
            operator: Exists
            key: node.cloudprovider.kubernetes.io/uninitialized
    #      nodeSelector:
    #         node-role.kubernetes.io/master: ""
    

部署设备插件

1
2
3
kubectl create -f https://raw.githubusercontent.com/AliyunContainerService/gpushare-device-plugin/master/device-plugin-rbac.yaml

kubectl create -f https://raw.githubusercontent.com/AliyunContainerService/gpushare-device-plugin/master/device-plugin-ds.yaml

注意事项

  • 默认情况下,GPU显存以GiB为单位,若需要使用MiB为单位,修改device-plugin-ds.yaml,将–memory-unit=GiB修改为–memory-unit=MiB

配置节点

下载kubectl

1
2
3
4
5
6
chmod +x /usr/bin/kubectl

# gpushare 插件
https://github.com/AliyunContainerService/gpushare-device-plugin/releases/download/v0.3.0/kubectl-inspect-gpushare

chmod +x /usr/bin/kubectl-inspect-gpushare

为要安装设备插件的所有节点添加标签“gpushare=true”,因为设备插件是 deamonset

1
2
3
4
5
6
7
8
kubectl get nodes
NAME           STATUS   ROLES                      AGE   VERSION
xxx   Ready    controlplane,etcd,worker   47m   v1.18.6
# 加标签
kubectl label node xxx gpushare=true

# 如果node状态不对 SchedulingDisabled
kubectl patch node kube-node1 -p '{"spec":{"unschedulable":false}}'

测试

1
2
3
4
5
6
7
8
9
10
11
12
13
kubectl get pods -n kube-system |grep gpushare

gpushare-device-plugin-ds-z27jc           1/1     Running     0          23m
gpushare-schd-extender-56799db8c7-8gshd   1/1     Running     0          25m

# 通过插件看GPU分配情况
kubectl-inspect-gpushare

NAME          IPADDRESS     GPU0(Allocated/Total)  GPU Memory(GiB)
10.81.25.224  10.81.25.224  0/14                   0/14
--------------------------------------------------------
Allocated/Total GPU Memory In Cluster:
0/14 (0%)  

测试

部署官方测试demo

1
2
3
4
5
6
7
8
9
10
11
12
13
14
15
16
17
18
19
20
21
22
23
24
25
26
27
28
29
apiVersion: apps/v1
kind: Deployment

metadata:
  name: binpack-1
  labels:
    app: binpack-1

spec:
  replicas: 3

  selector: # define how the deployment finds the pods it mangages
    matchLabels:
      app: binpack-1

  template: # define the pods specifications
    metadata:
      labels:
        app: binpack-1

    spec:
      containers:
      - name: binpack-1
        image: cheyang/gpu-player:v2
        resources:
          limits:
            # GiB
            aliyun.com/gpu-mem: 1  

1
2
3
4
5
6
7
8
9
10
11
12
13
14
# 查看情况
kubectl get pods
NAME                         READY   STATUS    RESTARTS   AGE
binpack-1-79dd548c78-9c49p   1/1     Running   0          4m23s
binpack-1-79dd548c78-f9bg2   1/1     Running   0          4m23s
binpack-1-79dd548c78-z2v6p   1/1     Running   0          4m23s


kubectl-inspect-gpushare
NAME          IPADDRESS     GPU0(Allocated/Total)  GPU Memory(GiB)
10.81.25.224  10.81.25.224  3/14                   3/14
--------------------------------------------------------
Allocated/Total GPU Memory In Cluster:
3/14 (21%)  

问题

和kubeflow结合,调度会失败,pod一直卡在pending

1
2
3
4
5
6
7
8
9
10
11
12
Status:
  Components:
    Predictor:
      Latest Created Revision:  firesmoke-predictor-default-00001
  Conditions:
    Last Transition Time:  2023-02-07T16:30:17Z
    Message:               Revision "firesmoke-predictor-default-00001" failed with message: binding rejected: failed bind with extender at URL http://127.0.0.1:32766/gpushare-scheduler/bind, code 500.
    Reason:                RevisionFailed
    .....
    Status:                False
    Type:                  Ready
Events:                    <none>

NVIDIA GPU 方案

安装 nvidia-container-toolkit

安装nvidia-container-toolkit

1
2
3
4
5
distribution=$(. /etc/os-release;echo $ID$VERSION_ID)
curl -s -L https://nvidia.github.io/libnvidia-container/gpgkey | sudo apt-key add -
curl -s -L https://nvidia.github.io/libnvidia-container/$distribution/libnvidia-container.list | sudo tee /etc/apt/sources.list.d/libnvidia-container.list

sudo apt-get update && sudo apt-get install -y nvidia-container-toolkit

配置docker

使用 运行kubernetesdocker,编辑通常存在的配置文件/etc/docker/daemon.json以设置nvidia-container-runtime为默认的低级运行时:

1
2
3
4
5
6
7
8
9
{
    "default-runtime": "nvidia",
    "runtimes": {
        "nvidia": {
            "path": "/usr/bin/nvidia-container-runtime",
            "runtimeArgs": []
        }
    }
}

然后重新启动docker

1
$ sudo systemctl restart docker

NVIDIA device plugin

根据k8s官网安装NVIDIA device plugin,这个只能做到GPU被独占的效果,生产不使用

1
$ kubectl create -f https://raw.githubusercontent.com/NVIDIA/k8s-device-plugin/v0.13.0/nvidia-device-plugin.yml

安装成功

1
2
3
4
5
6
7
8
9
10
11
12
Allocated resources:
  (Total limits may be over 100 percent, i.e., overcommitted.)
  Resource              Requests     Limits
  --------              --------     ------
  cpu                   3870m (12%)  66800m (208%)
  memory                8230Mi (3%)  39848Mi (15%)
  ephemeral-storage     0 (0%)       0 (0%)
  hugepages-1Gi         0 (0%)       0 (0%)
  hugepages-2Mi         0 (0%)       0 (0%)
  .....
  nvidia.com/gpu        1            1  # 这里会有数值
Events:                 <none>

NVIDIA operator

这个可以做到GPU share效果,使用的是Multi-Instance GPU (MIG)

MIG 允许您将 GPU 划分为多个较小的预定义实例,每个实例看起来都像一个迷你 GPU,在硬件层提供内存和故障隔离。您可以通过在这些预定义实例之一而不是完整的原生 GPU 上运行工作负载来共享对 GPU 的访问。

1
2
3
4
5
6
7
8
9
10
11
12
13
14
nvcr.io/nvidia/k8s/container-toolkit:v1.11.0-ubuntu20.04
nvcr.io/nvidia/cuda:11.7.1-base-ubi8
nvcr.io/nvidia/driver:525.60.13
nvcr.io/nvidia/gpu-feature-discovery:v0.7.0-ubi8
nvcr.io/nvidia/cloud-native/gpu-operator-validator:v22.9.2
nvcr.io/nvidia/k8s-device-plugin:v0.13.0-ubi8
nvcr.io/nvidia/cloud-native/k8s-driver-manager:v0.6.0
nvcr.io/nvidia/cloud-native/k8s-mig-manager:v0.5.0-ubuntu20.04
k8s.gcr.io/nfd/node-feature-discovery:v0.10.1
nvcr.io/nvidia/kubevirt-gpu-device-plugin:v1.2.1
nvcr.io/nvidia/gpu-operator:v22.9.2
nvcr.io/nvidia/cloud-native/vgpu-device-manager:v0.2.0
nvcr.io/nvidia/cloud-native/dcgm:3.1.3-1-ubuntu20.04
nvcr.io/nvidia/k8s/dcgm-exporter:3.1.3-3.1.2-ubuntu20.04
1
2
3
4
helm repo add nvidia https://helm.ngc.nvidia.com/nvidia


helm fetch nvidia/gpu-operator

开启GPU share 官方文档

time-slicing-config.yaml,GPU 进行共享访问的配置,部署好后修改配置要重启nvidia-device-plugin-daemonset才会生效。

1
2
3
4
5
6
7
8
9
10
11
12
13
apiVersion: v1
kind: ConfigMap
metadata:
  name: time-slicing-config
  namespace: gpu-operator
data:
    tesla-t4: |-
        version: v1
        sharing:
          timeSlicing:
            resources:
            - name: nvidia.com/gpu
              replicas: 4  # 相当于一张卡分成4份 像CPU一样分时访问资源
1
2
kubectl create namespace gpu-operator
kubectl create -f time-slicing-config.yaml
1
2
3
4
5
6
7
8
9
10
11
12
13
14
15
16
17
18
19
20
21
22
23
24
25
26
27
28
29
30
31
32
33
34
35
36
37
38
39
40
41
42
43
44
45
46
47
48
49
50
51
52
53
54
55
56
57
58
59
60
61
62
63
validator:
  repository: library/nvcr.io/nvidia/cloud-native

operator:
  repository: library/nvcr.io/nvidia
  initContainer:
    repository: library/nvcr.io/nvidia

driver:
  enabled: false # 已经提前安装了 禁用
  repository: library/nvcr.io/nvidia

  manager:
    repository: library/nvcr.io/nvidia/cloud-native

toolkit:
  enabled: false  # 已经提前安装了 禁用
  repository: library/nvcr.io/nvidia/k8s

# 默认配置针对针对整个集群
devicePlugin:
  repository: library/nvcr.io/nvidia
  config:
    name: "time-slicing-config"  # 开启 gpu share  ConfigMap 名称
    default: "tesla-t4"   # 共享配置名

dcgm:
  repository: library/nvcr.io/nvidia/cloud-native

dcgmExporter:
  repository: library/nvcr.io/nvidia/k8s

gfd:
  repository: library/nvcr.io/nvidia

migManager:
  repository: library/nvcr.io/nvidia/cloud-native

nodeStatusExporter:
  repository: library/nvcr.io/nvidia/cloud-native

gds:
  repository: library/nvcr.io/nvidia/cloud-native

vgpuManager:
  driverManager:
    repository: library/nvcr.io/nvidia/cloud-native

vgpuDeviceManager:
  repository: library/nvcr.io/nvidia/cloud-native

vfioManager:
  repository: library/nvcr.io/nvidia
  driverManager:
    repository: library/nvcr.io/nvidia/cloud-native

sandboxDevicePlugin:
  repository: library/nvcr.io/nvidia

node-feature-discovery:
  image:
    repository: library/k8s.gcr.io/nfd/node-feature-discovery

安装

1
helm install gpu-operator gpu-operator-v22.9.2.tgz -n gpu-operator -f gpu_operator_values.yaml

operator运行情况

1
2
3
4
5
6
7
8
9
10
11
12
kubectl get pods -n gpu-operator

NAME                                                          READY   STATUS      RESTARTS        AGE
gpu-feature-discovery-jvc6v                                   2/2     Running     0               4d3h
gpu-operator-659966d9f4-fxx48                                 1/1     Running     2               4d4h
gpu-operator-node-feature-discovery-master-76cdf4f4d9-6cwzc   1/1     Running     122 (33m ago)   4d4h
gpu-operator-node-feature-discovery-worker-hcdzt              1/1     Running     20 (109m ago)   4d4h
nvidia-cuda-validator-zsv2x                                   0/1     Completed   0               4d3h
nvidia-dcgm-exporter-6wk2c                                    1/1     Running     0               4d4h
nvidia-device-plugin-daemonset-m9pp6                          2/2     Running     0               4d3h
nvidia-device-plugin-validator-t226k                          0/1     Completed   0               4d3h
nvidia-operator-validator-x4xwn                               1/1     Running     0               4d3h
1
2
3
4
5
6
7
8
9
10
11
12
13
14
15
16
17
18
19
kubectl describe node

Capacity:
  cpu:                32
  ephemeral-storage:  98316524Ki
  hugepages-1Gi:      0
  hugepages-2Mi:      0
  memory:             264137764Ki
  nvidia.com/gpu:     4
  pods:               330
Allocatable:
  cpu:                32
  ephemeral-storage:  90608508369
  hugepages-1Gi:      0
  hugepages-2Mi:      0
  memory:             264035364Ki
  nvidia.com/gpu:     4   # 一张卡分成4份
  pods:               330
System Info:

测试

1
2
3
4
5
6
7
8
9
10
11
12
13
14
15
16
17
18
19
20
21
22
23
24
25
26
27
28
29
30
31
32
apiVersion: apps/v1
kind: Deployment
metadata:
  name: nvidia-plugin-test
  labels:
    app: nvidia-plugin-test
spec:
  replicas: 5
  selector:
    matchLabels:
      app: nvidia-plugin-test
  template:
    metadata:
      labels:
        app: nvidia-plugin-test
    spec:
      tolerations:
        - key: nvidia.com/gpu
          operator: Exists
          effect: NoSchedule
      containers:
        - name: dcgmproftester11
          image: nvidia/samples:dcgmproftester-2.0.10-cuda11.0-ubuntu18.04
          command: ["/bin/sh", "-c"]
          args:
            - while true; do /usr/bin/dcgmproftester11 --no-dcgm-validation -t 1004 -d 300; sleep 30; done
          resources:
           limits:
             nvidia.com/gpu: 1
          securityContext:
            capabilities:
              add: ["SYS_ADMIN"]
1
2
3
4
5
6
7
kubectl get pod
NAME                                  READY   STATUS    RESTARTS   AGE
nvidia-plugin-test-588c9575f9-426xd   1/1     Running   0          41s
nvidia-plugin-test-588c9575f9-4r244   1/1     Running   0          41s
nvidia-plugin-test-588c9575f9-hb9c9   1/1     Running   0          41s
nvidia-plugin-test-588c9575f9-qr9np   0/1     Pending   0          41s  # 其中一个因为资源不够而无法创建
nvidia-plugin-test-588c9575f9-v86zs   1/1     Running   0          41s
1
2
3
4
5
Events:
  Type     Reason            Age                  From               Message
  ----     ------            ----                 ----               -------
  Warning  FailedScheduling  2m31s                default-scheduler  0/1 nodes are available: 1 Insufficient nvidia.com/gpu.
  Warning  FailedScheduling  2m5s (x1 over 2m7s)  default-scheduler  0/1 nodes are available: 1 Insufficient nvidia.com/gpu.

volcano

通过自定义scheduler,实现gpu-mem共享

Volcano是CNCF 下首个也是唯一的基于Kubernetes的容器批量计算平台,主要用于高性能计算场景。它提供了Kubernetes目前缺 少的一套机制,这些机制通常是机器学习大数据应用、科学计算、特效渲染等多种高性能工作负载所需的。作为一个通用批处理平台,Volcano与几乎所有的主流计算框 架无缝对接,如SparkTensorFlowPyTorchFlinkArgoMindSporePaddlePaddle 等。它还提供了包括基于各种主流架构的CPU、GPU在内的异构设备混合调度能力。Volcano的设计 理念建立在15年来多种系统和平台大规模运行各种高性能工作负载的使用经验之上,并结合来自开源社区的最佳思想和实践。

image

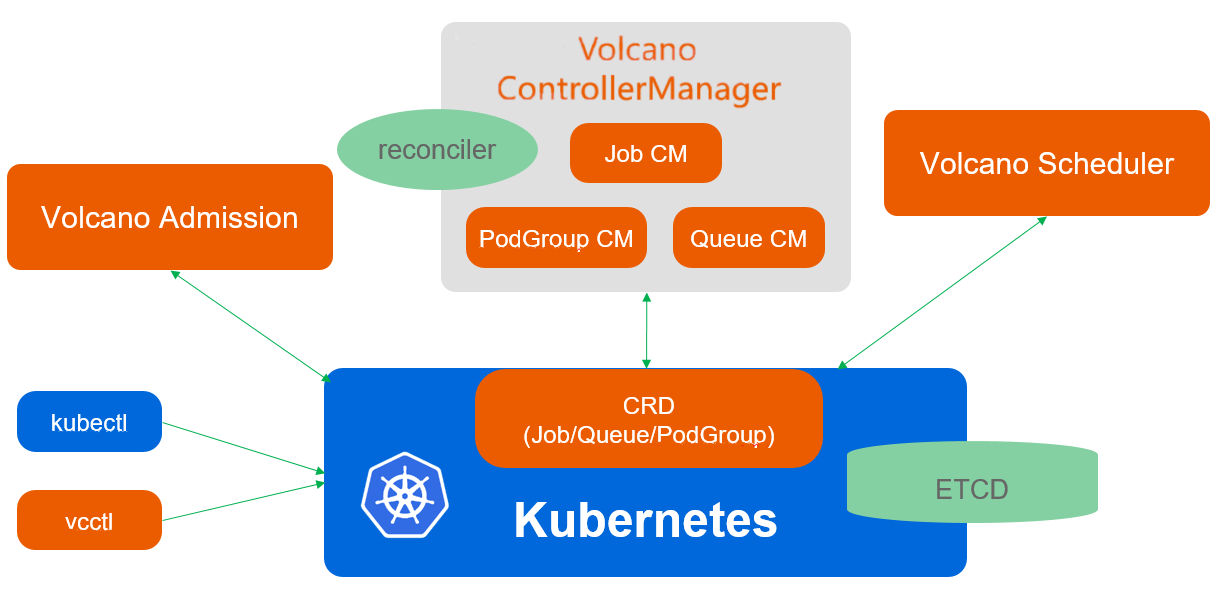
Volcano由scheduler、controllermanager、admission

  • Scheduler Volcano scheduler通过一系列的action和plugin调度Job,并为它找到一个最适合的节点。与Kubernetes default-scheduler相比,Volcano与众不同的 地方是它支持针对Job的多种调度算法。
  • Controllermanager Volcano controllermanager管理CRD资源的生命周期。它主要由Queue ControllerManagerPodGroupControllerManagerVCJob ControllerManager构成
  • Admission Volcano admission负责对CRD API资源进行校验

podgroup是一组强关联pod的集合,主要用于批处理工作负载场景
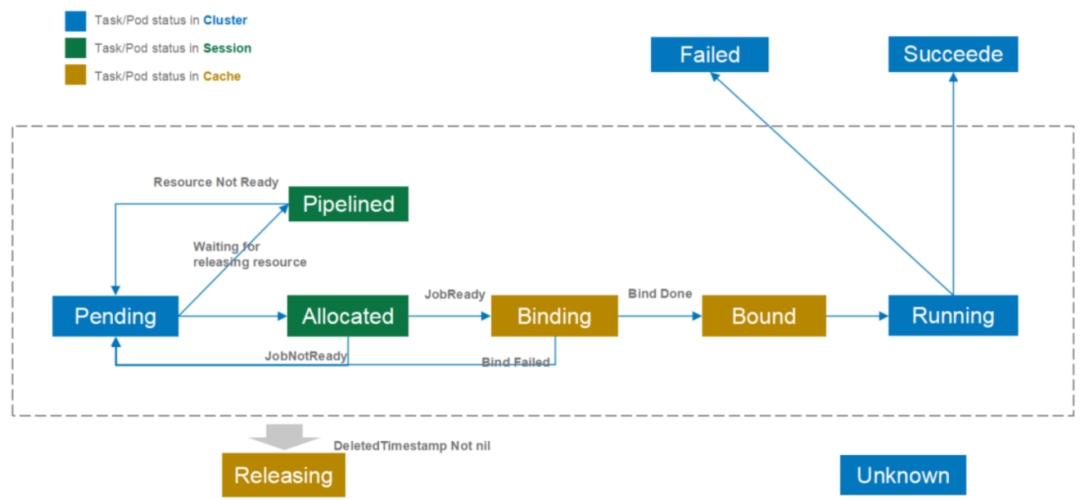
image

  • pending

    pending表示该podgroup已经被volcano接纳,但是集群资源暂时不能满足它的需求。一旦资源满足,该podgroup将转变为running状态。

  • running

    running表示该podgroup至少有minMember个pod或任务处于running状态。

  • unknown

    unknown表示该podgroup中minMember数量的pod或任务分为2种状态,部分处于running状态,部分没有被调度。没有被调度的原因可能是资源不够等。调度 器将等待controller重新拉起这些pod或任务。

  • inqueue

    inqueue表示该podgroup已经通过了调度器的校验并入队,即将为它分配资源。inqueue是一种处于pending和running之间的中间状态。

queue是容纳一组podgroup的队列,也是该组podgroup获取集群资源的划分依据

  • Open

    该queue当前处于可用状态,可接收新的podgroup

  • Closed

    该queue当前处于不可用状态,不可接收新的podgroup

  • Closing

    该Queue正在转化为不可用状态,不可接收新的podgroup

  • Unknown

    该queue当前处于不可知状态,可能是网络或其他原因导致queue的状态暂时无法感知

volcano启动后,会默认创建名为default的queue,weight为1。后续下发的job,若未指定queue,默认属于default queue

安装volcano

安装参考

helm chart 下载https://github.com/volcano-sh/volcano/tree/release-1.7/installer/helm/chart

1
2
3
4
volcanosh/vc-controller-manager:v1.7.0
volcanosh/vc-scheduler:v1.7.0
volcanosh/vc-webhook-manager:v1.7.0
volcanosh/volcano-device-plugin:v1.0.0

命名空间必须是volcano-system,不然volcano-admission-service-pods-mutate起不来

1
helm install volcano volcano-1.7.0-beta.0.tgz -n volcano-system --create-namespace -f volcano_values.yaml

volcano_values.yaml

1
2
3
4
5
basic:
  image_tag_version: "v1.7.0"
  controller_image_name: "xxx:8080/library/volcanosh/vc-controller-manager"
  scheduler_image_name: "xxx:8080/library/volcanosh/vc-scheduler"
  admission_image_name: "xxx:8080/library/volcanosh/vc-webhook-manager"

打开GPU share 开关

1
kubectl edit cm -n volcano-system volcano-scheduler-configmap

scheduler介绍

1
2
3
4
5
6
7
8
9
10
11
12
13
14
15
16
17
18
19
20
21
22
23
24
apiVersion: v1
data:
  volcano-scheduler.conf: |
    actions: "enqueue, allocate, backfill"
    tiers:
    - plugins:
      - name: priority
      - name: gang
        enablePreemptable: false
      - name: conformance
    - plugins:
      - name: overcommit
      - name: drf
        enablePreemptable: false
      - name: predicates
        arguments:
          predicate.GPUSharingEnable: true # enable gpu sharing
      - name: proportion
      - name: nodeorder
      - name: binpack
kind: ConfigMap
metadata:
  name: volcano-scheduler-configmap
  namespace: volcano-system

安装Volcano device plugin

前置参考

  • NVIDIA drivers ~= 384.81
  • nvidia-docker version > 2.0 (see how to install and it’s prerequisites)
  • docker configured with nvidia as the default runtime.
  • Kubernetes version >= 1.10

下载volcano-device-plugin.yaml使用最新的不然有权限问题

运行情况

1
2
3
4
5
6
7
8
9
10
11
12
13
14
15
kubectl get pod -n kube-system -l name=volcano-device-plugin
NAME                          READY   STATUS    RESTARTS   AGE
volcano-device-plugin-286xw   1/1     Running   0          95m


kubectl describe node

Capacity:
...
  volcano.sh/gpu-memory:  15109
  volcano.sh/gpu-number:  1
Allocatable:
...
  volcano.sh/gpu-memory:  15109
  volcano.sh/gpu-number:  1

测试

普通pod

1
2
3
4
5
6
7
8
9
10
11
12
13
14
15
16
apiVersion: v1
kind: Pod
metadata:
  name: gpu-pod1
spec:
  schedulerName: volcano  # 使用volcano调度
  containers:
    - name: cuda-container
      image: xxx:8080/library/nvidia/cuda:11.6.2-base-ubuntu20.04
      command: ["sleep"]
      args: ["100000"]
      resources:
        limits:
          volcano.sh/gpu-memory: 2048 # requesting 1024MB GPU memory


使用volcano调度,nvidia-smi 看不到任何进程,可以通过describe查看已分配资源

1
2
3
4
5
6
7
8
9
10
11
12
13
14
kubectl describe node

Allocated resources:
  (Total limits may be over 100 percent, i.e., overcommitted.)
  Resource               Requests          Limits
  --------               --------          ------
  cpu                    19075m (59%)      77 (240%)
  memory                 21287195008 (7%)  58473669888 (21%)
  ephemeral-storage      0 (0%)            0 (0%)
  hugepages-1Gi          0 (0%)            0 (0%)
  hugepages-2Mi          0 (0%)            0 (0%)
  nvidia.com/gpu         4                 4
  volcano.sh/gpu-memory  2048              2048
  volcano.sh/gpu-number  0                 0

kubeflow

1
kubectl edit cm config-features -n knative-serving

打开schedulerName feature,不然会报错

1
2
3
4
5
6
7
apiVersion: v1
kind: ConfigMap
metadata:
  name: config-features
  namespace: knative-serving
data:
  kubernetes.podspec-schedulername: enabled # enabled special schedulername feature
1
2
3
4
5
6
7
8
9
10
11
12
13
14
15
16
17
18
19
20
21
apiVersion: "serving.kserve.io/v1beta1"
kind: "InferenceService"
metadata:
  name: "volcano"
spec:
  predictor:
    schedulerName: volcano  # 使用volcano调度
    minReplicas: 0
    containers:
      - name: kserve-container
        image: xxxx:8080/library/model/firesmoke:v1
        env:
          - name: MODEL_NAME
            value: volcano
        command:
          - python
          - -m
          - fire_smoke
        resources:
          limits:
            volcano.sh/gpu-memory: 2048   # 使用volcano调度