nginx 安装
https://rhel.pkgs.org/8/nginx-x86_64/nginx-1.22.0-1.el8.ngx.x86_64.rpm.html
概念
进程模型
unix系统中会以daemon的方式在后台运行,后台进程包含一个master进程和多个worker进程。
nginx默认是以多进程的方式来工作的
独立的进程,不需要加锁,所以省掉了锁带来的开销。采用独立的进程,可以让互相之间不会影响,一个进程退出后,其它进程还在工作,服务不会中断,master进程则很快启动新的worker进程。
-
master进程
接收来自外界的信号,向各worker进程发送信号,监控worker进程的运行状态
-
worker进程
处理基本的网络事件
多个worker进程之间是对等的,互相之间是独立。一个请求,只可能在一个worker进程中处理。为保证只有一个进程处理该连接,所有worker进程在注册listenfd读事件前抢accept_mutex,抢到互斥锁的那个进程注册listenfd读事件,在读事件里调用accept接受该连接。
锁的竞争,worker_connections 每个worker进程所能建立连接的最大值可用的连接变少,让出accept_mutex的机会变大。
worker进程个数通常等于机器cpu核数,更多的worker数,只会导致进程来竞争cpu资源了,从而带来不必要的上下文切换。
工作方式
异步非阻塞
同时监控多个事件,调用他们是阻塞的,但可以设置超时时间,在超时时间之内,如果有事件准备好了,就返回。
只要有事件准备好了,我们就去处理它,只有当所有事件都没准备好时,才会等待。
这里的并发请求,是指未处理完的请求,线程只有一个,所以同时能处理的请求当然只有一个了,只是在请求间进行不断地切换而已,切换也是因为异步事件未准备好,而主动让出的。这里的切换是没有任何代价,你可以理解为循环处理多个准备好的事件,事实上就是这样的。与多线程相比,这种事件处理方式是有很大的优势的,不需要创建线程,每个请求占用的内存也很少,没有上下文切换,事件处理非常的轻量级。并发数再多也不会导致无谓的资源浪费(上下文切换)。更多的并发数,只是会占用更多的内存而已。
1 | |
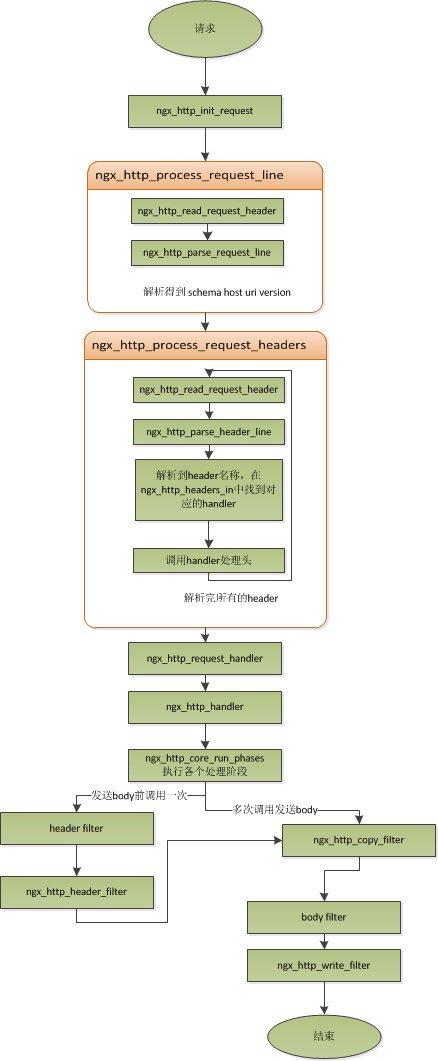
请求处理
常用配置
反向代理
反向代理,客户端对代理是无感知的,客户端不需要任何配置就可以访问,客户端将请求发送到反向代理服务器,由反向代理服务器去选择目标服务器获取数据后,在返回给客户端,此时反向代理服务器和目标服务器对外就是一个服务器,暴露的是代理服务器地址,隐藏了真实服务器IP地址。
1 | |
| 访问URL | location配置 | proxy_pass配置 | 后端接收的请求 | 备注 |
|---|---|---|---|---|
test.com/user/test.html |
/user/ | http://test1/ | /test.html | |
test.com/user/test.html |
/user/ | http://test1 | /user/test.html | |
test.com/user/test.html |
/user | http://test1 | /user/test.html | |
test.com/user/test.html |
/user | http://test1/ | //test.html | |
test.com/user/test.html |
/user/ | http://test1/haha/ | /haha/test.html | |
test.com/user/test.html |
/user/ | http://test1/haha | /hahatest.html |
正则 不同路径location匹配不同proxy_pass
1 | |
端口转发 4层
1 | |
1 | |
rpc转发
1 | |
正向代理
正向代理服务器位于客户端和服务器之间,为了从服务器获取数据,客户端要向代理服务器发送一个请求,并指定目标服务器,代理服务器将目标服务器返回的数据转交给客户端。这里客户端需要要进行一些正向代理的设置的。
http
1 | |
1 | |
https
使用ngx_http_proxy_connect_modulenginx默认不支持https的正向代理,需要自己重新编译
1 | |
–with-debug可开可不开 不支持自签名证书
1 | |
共用端口
1 | |
nginx如果检测到a.com的请求,将原样转发请求到本机的8080端口,如果检测到的是b.com请求,也会将请求转发到8081端口
匹配阶段
- 根据请求中的目的地址和端口进行匹配。如果相同的目的地址和端口同时还会对应多个servers,再根据server_name属性进行进一步匹配。需要强调的是,只有当listen指令无法找到最佳匹配时才会考虑评估server_name指令。
- 在匹配到server后,Nginx根据请求URL中的path信息再匹配server中定义的某一个location。
负载均衡
-
轮询 每个请求按时间顺序逐一分配到不同的后端服务器,如果后端服务器down掉,能自动剔除。
1
2
3
4
5
6
7
8
9
10
11
12
13
14upstream api { server 127.0.0.1:9002 ; server 127.0.0.1:19002 ; } location /api/2/ { proxy_pass http://api; proxy_set_header Host $host; proxy_set_header X-Real-IP $remote_addr; proxy_set_header X-Forwarded-For $proxy_add_x_forwarded_for; proxy_read_timeout 300s; } -
weight
权重越高,在被访问的概率越大
1
2
3
4
5
6
upstream api { server 127.0.0.1:9002 backup; # 其它所有的非backup机器down或者忙的时候,请求backup机器) server 127.0.0.1:19002 weight=10 max_fails=3 fail_timeout=30s max_conns=1; server 127.0.0.1:19003 weight=10 max_fails=3 fail_timeout=30s max_conns=1; server 127.0.0.1:19004 weight=10 max_fails=3 fail_timeout=30s max_conns=1; }-
max_fails
默认为1,允许请求失败的次数。当超过最大次数时,返回proxy_next_upstream 模块定义的错误
-
fail_timeout
默认10秒,max_fails次失败后,在fail_timeout期间内,nginx会认为这台Server暂时不可用,不会将请求分配给它
-
max_conns
默认0不限制,限制分配给某台Server处理的最大连接数量,超过这个数量,将不会分配新的连接给它
-
-
ip_hash
1
2
3
4
5
upstream item { # item名字可以自定义 ip_hash; server 192.168.101.60:81; server 192.168.101.77:80; }根据客户端IP来分配服务器,解决session共享问题
缓存
1 | |
access log fmt
log 打印响应时间,还有upstream addr
nginx: [emerg] “log_format” directive is not allowed here log_format 要放在server外面
1 | |
-
request_time
request processing time in seconds with a milliseconds resolution; time elapsed between the first bytes were read from the client and the log write after the last bytes were sent to the client
请求处理时长,单位为秒,精度为毫秒,从读入客户端的第一个字节开始,直到把最后一个字符发送张客户端进行日志写入为止
即$request_time包括接收客户端请求数据的时间、后端程序响应的时间、发送响应数据给客户端的时间(不包含写日志的时间)
-
upstream_response_time
keeps time spent on receiving the response from the upstream server; the time is kept in seconds with millisecond resolution. Times of several responses are separated by commas and colons like addresses in the $upstream_addr variable.
从Nginx向后端建立连接开始到接受完数据然后关闭连接为止的时间
-
upstream_addr
记录负载均衡分发到那个addr
-
/dev/stdout
docker 容器标准输出
限流控制并发
限制IP的连接和并发分别有两个模块
limit_req_zone用来限制单位时间内的请求数,即速率限制,采用的漏桶算法 “leaky bucket”。limit_req_conn用来限制同一时间连接数,即并发限制。
请求数
ngx_http_limit_req_module
1 | |
执行流程:
(1)请求进入后判断最后一次请求时间相对于当前时间是否需要进行限流,若不需要,执行正常流程;否则,进入步骤2; (2)如果未配置漏桶容量(默认0),按照固定速率处理请求,若此时请求被限流,则直接返回503;否则,根据是否配置了延迟默认分别进入步骤3或步骤4; (3)配置了漏桶容量以及延迟模式(未配置nodelay),若漏桶满了,则新的请求将被限;如果漏桶没有满,则新的请求会以固定平均速率被处理(请求被延迟处理,基于sleep实现); (4)配置了漏桶容量以及nodelay,新请求进入漏桶会即可处理(不进行休眠,以便处理固定数量的突发流量);若漏桶满了,则请求被限流,直接返回响应。
连接数
ngx_http_limit_conn_module
限制单个IP的请求数。并非所有的连接都被计数。只有在服务器处理了请求并且已经读取了整个请求头时,连接才被计数。
基于key($binary_remote_addr或者server_name),对网络总连接数进行限流。
1 | |
桶算法
漏桶算法与令牌桶算法的区别在于:
- 漏桶算法能够强行限制数据的传输速率。
- 令牌桶算法能够在限制数据的平均传输速率的同时还允许某种程度的突发传输。
在某些情况下,漏桶算法不能够有效地使用网络资源。因为漏桶的漏出速率是固定的,所以即使网络中没有发生拥塞,漏桶算法也不能使某一个单独的数据流达到端口速率。因此,漏桶算法对于存在突发特性的流量来说缺乏效率。而令牌桶算法则能够满足这些具有突发特性的流量。通常,漏桶算法与令牌桶算法结合起来为网络流量提供更高效的控制。
令牌桶不一定比漏洞好,她们使用场景不一样。令牌桶可以用来保护自己,主要用来对调用者频率进行限流,为的是让自己不被打垮。所以如果自己本身有处理能力的时候,如果流量突发(实际消费能力强于配置的流量限制),那么实际处理速率可以超过配置的限制。
而漏桶算法,这是用来保护他人,也就是保护他所调用的系统。主要场景是,当调用的第三方系统本身没有保护机制,或者有流量限制的时候,我们的调用速度不能超过他的限制,由于我们不能更改第三方系统,所以只有在主调方控制。这个时候,即使流量突发,也必须舍弃。因为消费能力是第三方决定的。